Adding a Car
Adding your car is the most important part of joining Classic Rides. A good description, fair pricing and clear, well-lit photos of your vehicle will put you well on your way to your first booking. And if your car isn't on the website, it quite simply can't be booked!
The good news is that this entire process should take no longer than 10 minutes.
To begin, login to your account (https://www.classic-rides.co.za/owners/). This will take you to your Dashboard:
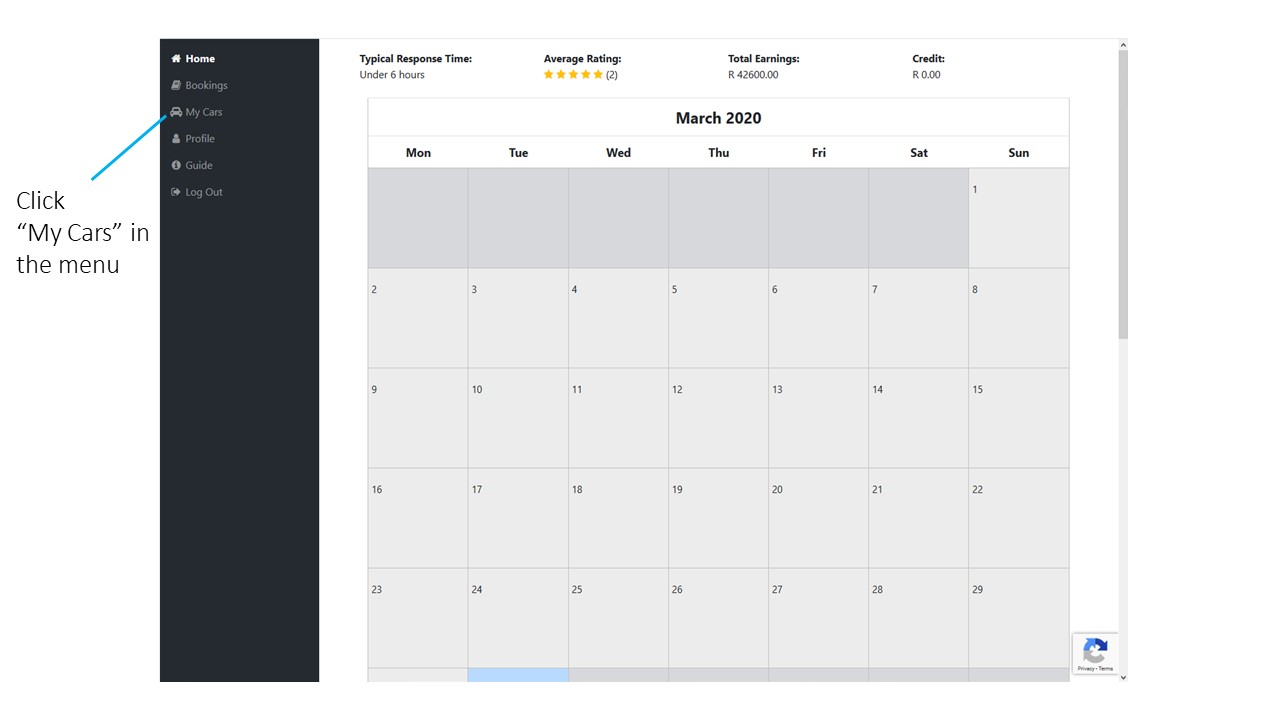
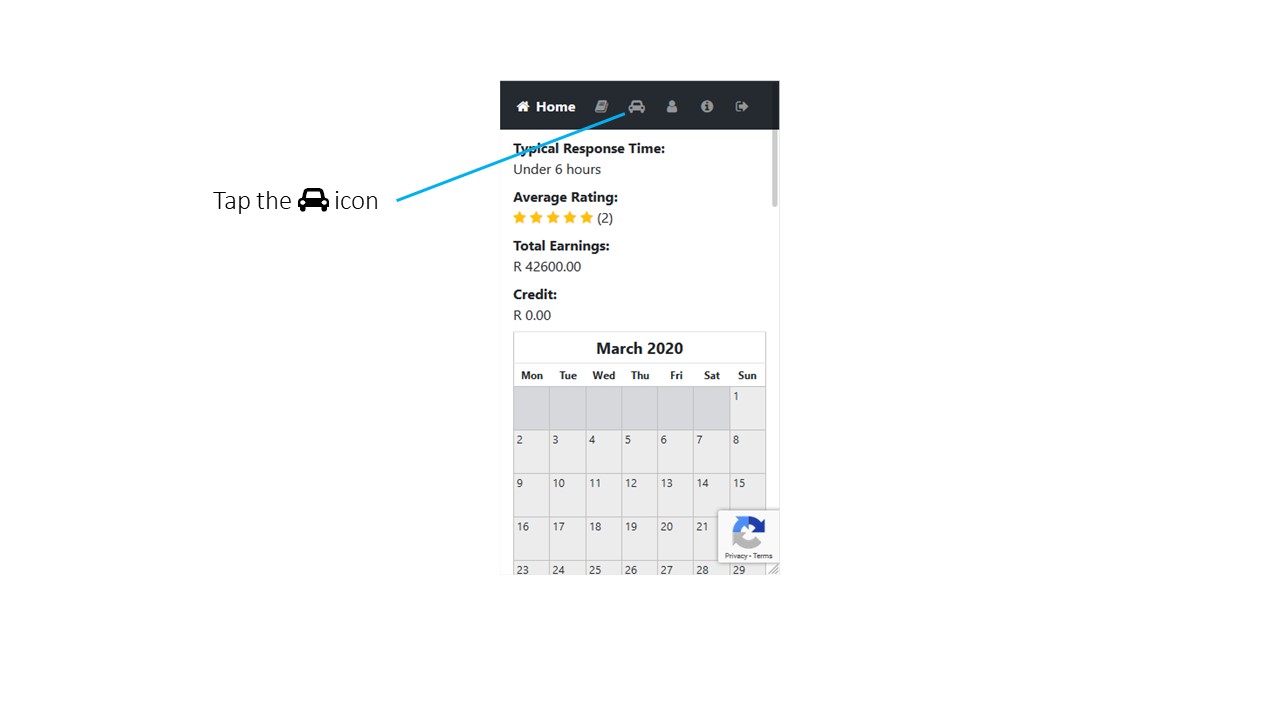
As indicated above, navigate to the "My Cars" page:
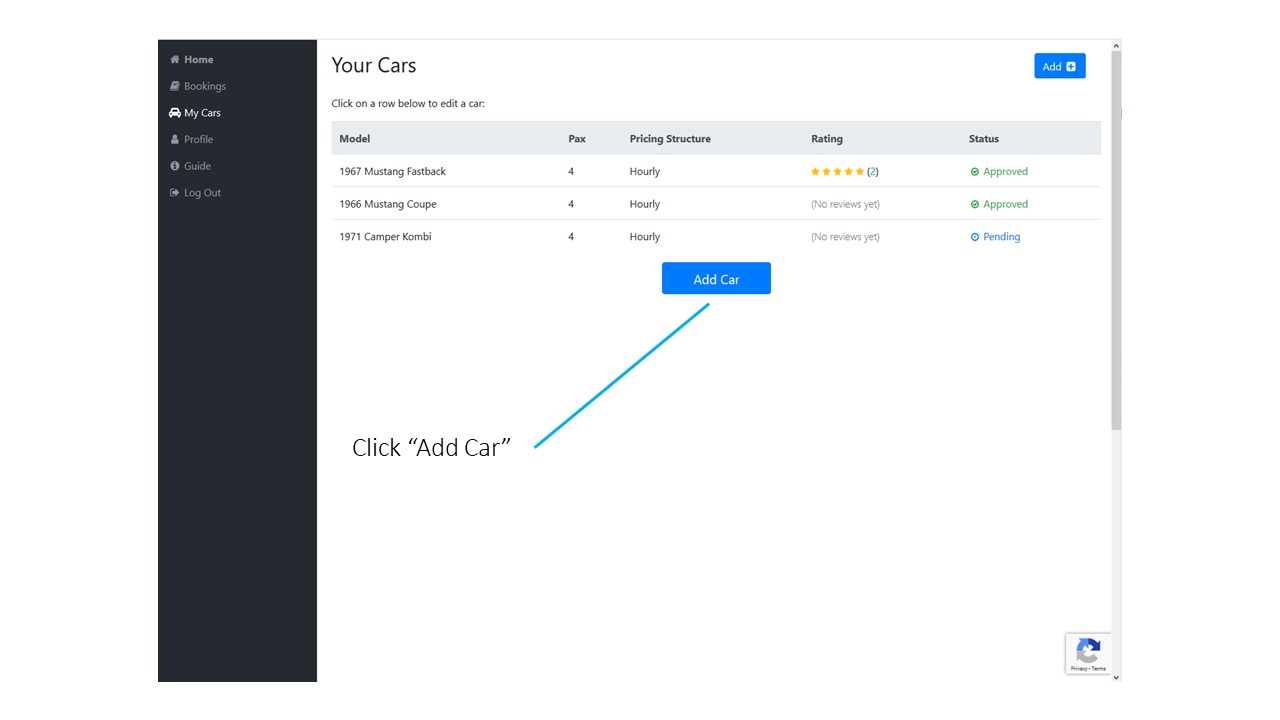
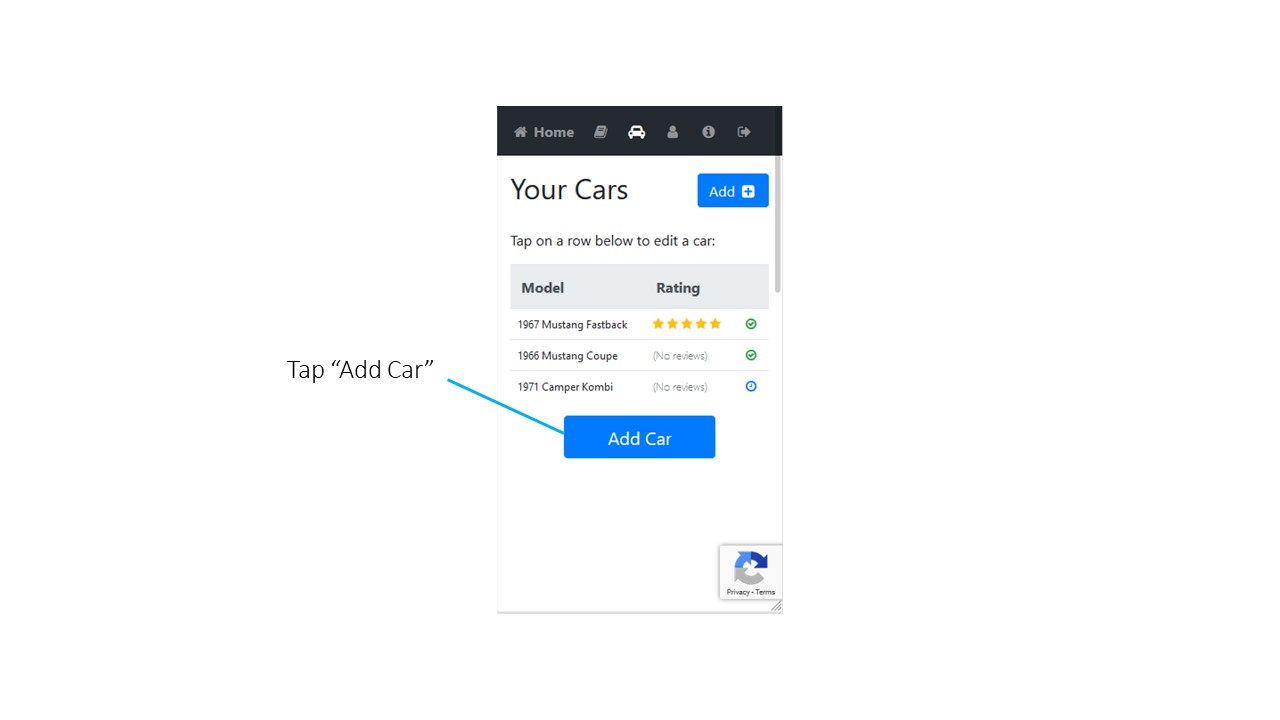
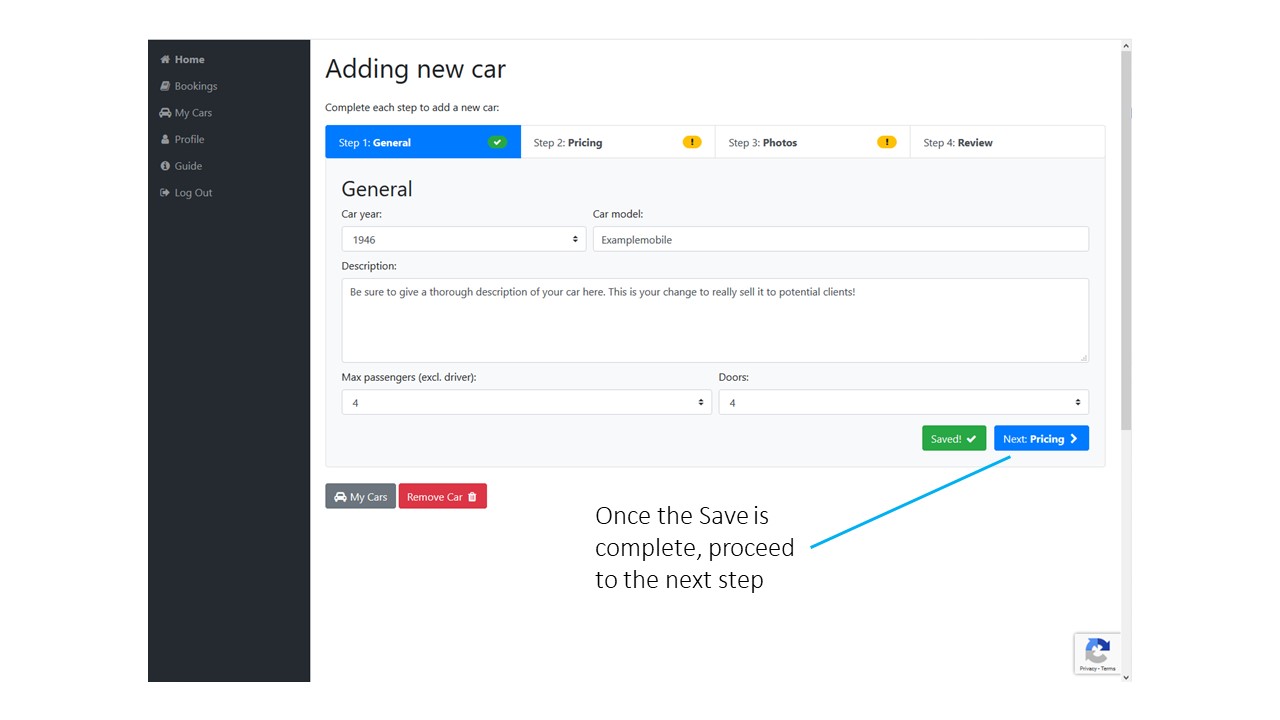
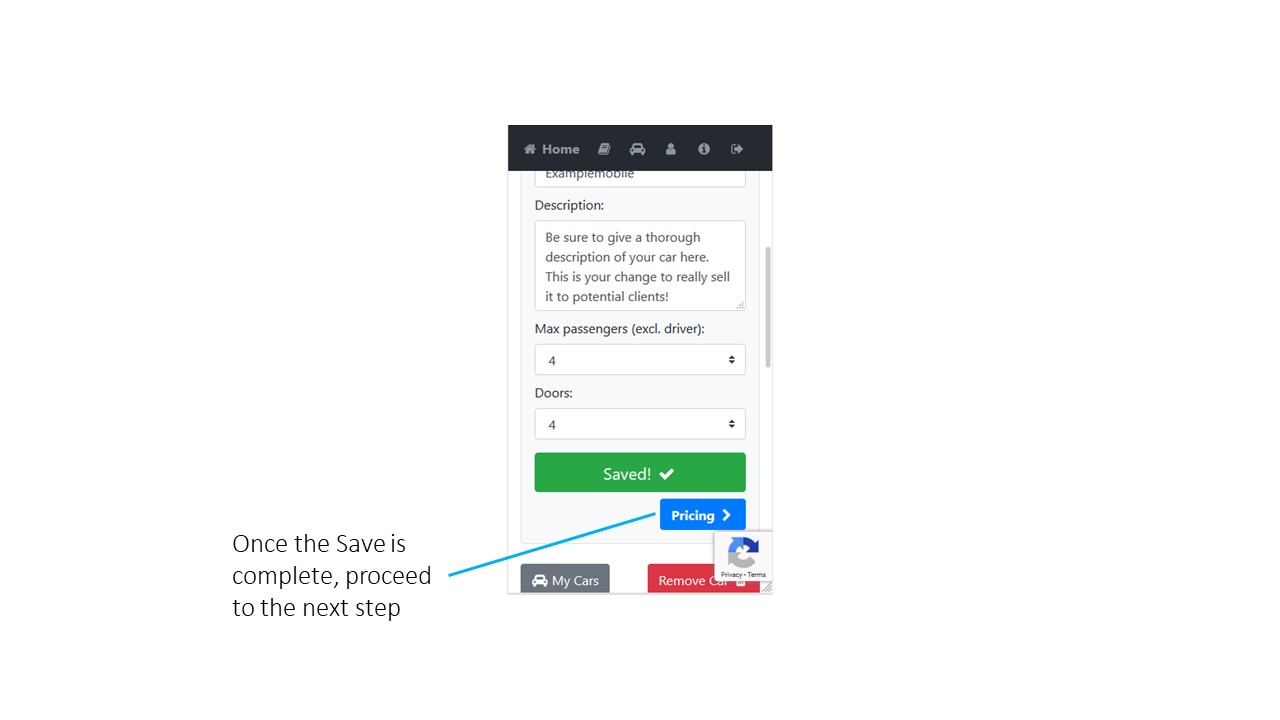
Once there, hit the "Add Car" button to begin adding your vehicle. You can then fill out all the initial fields. Once you've done this, hit the "Save" button so that you can proceed to the next step. Note that you won't be able to proceed to the following Steps until you've completed and saved Step 1.
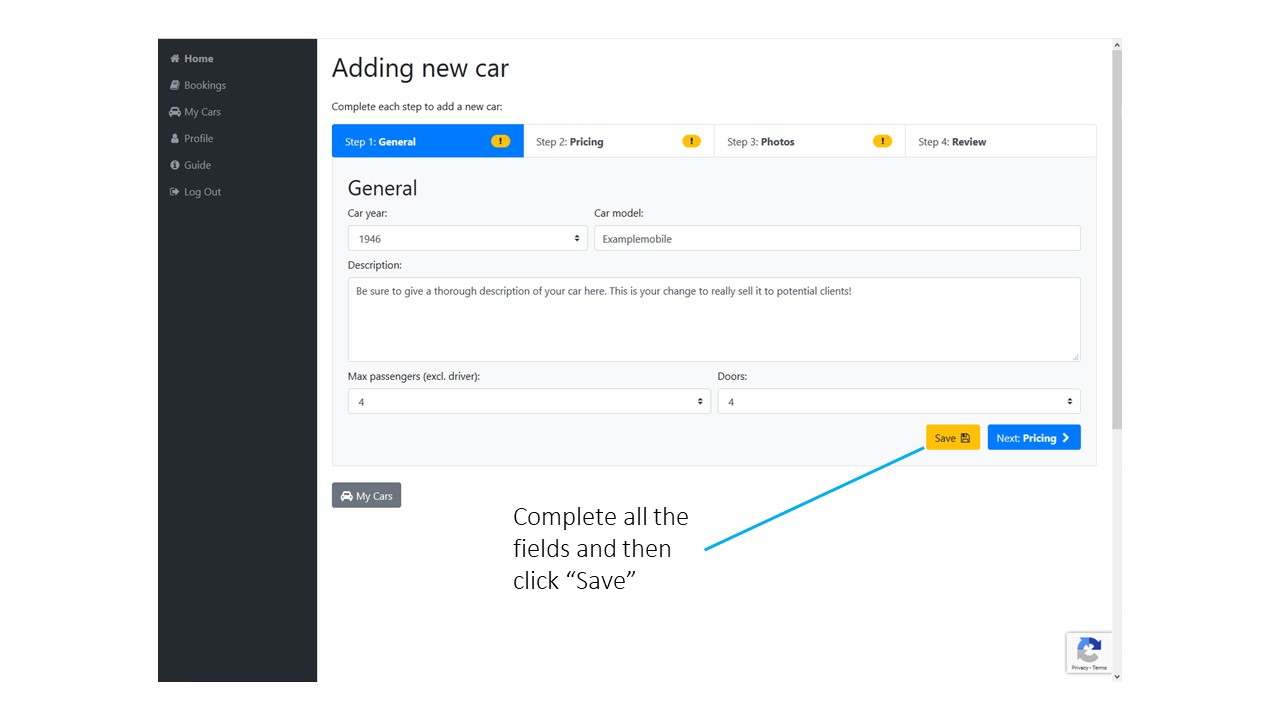
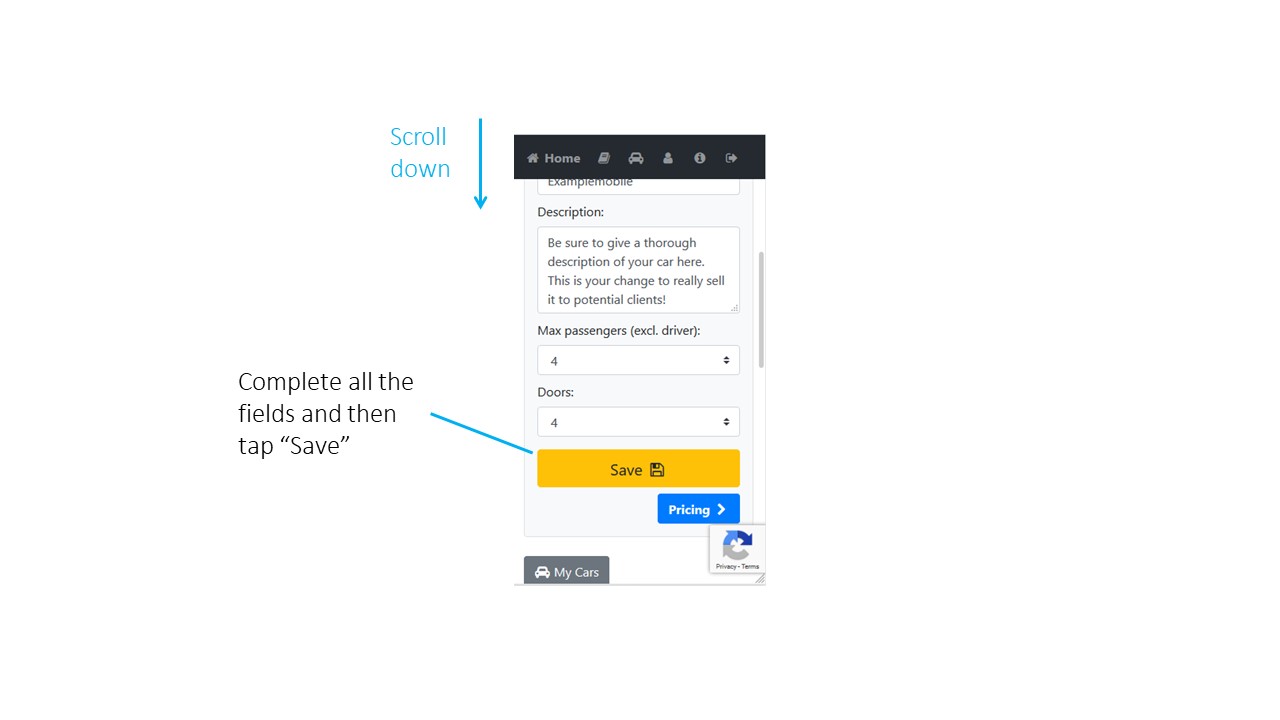
When the Step has been successfully saved, the button will turn green. You can then proceed to the next step:
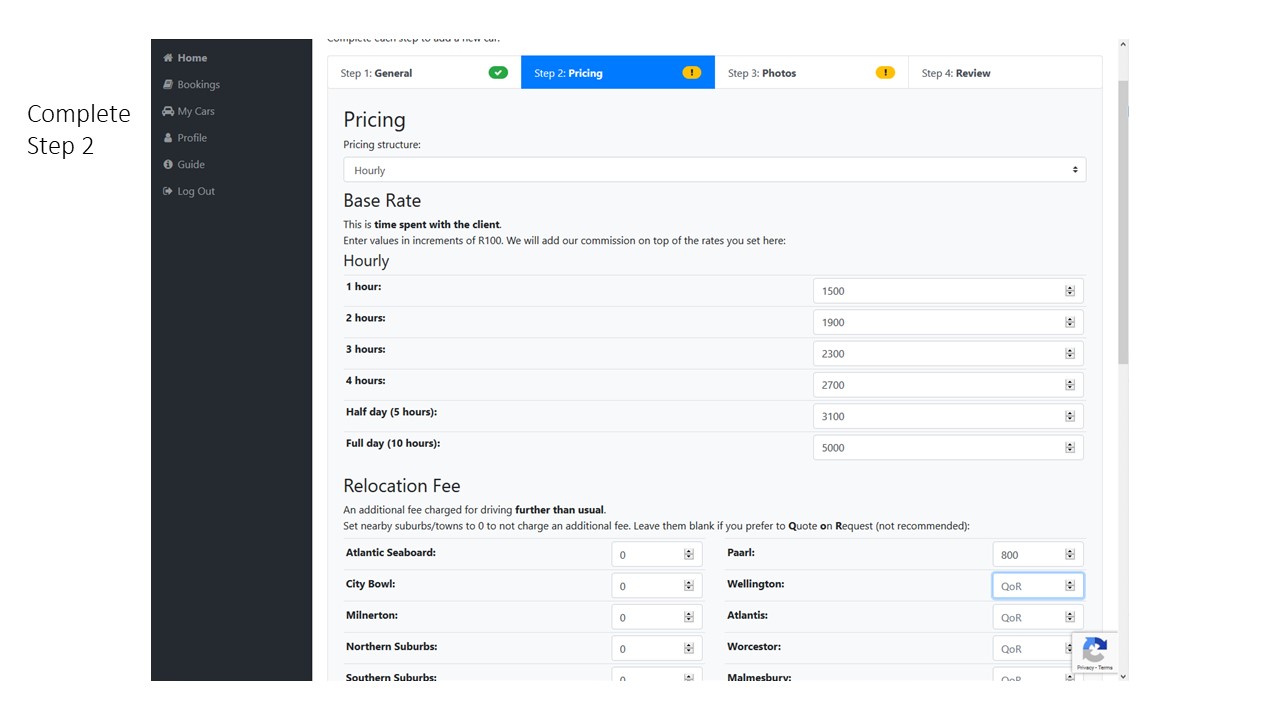
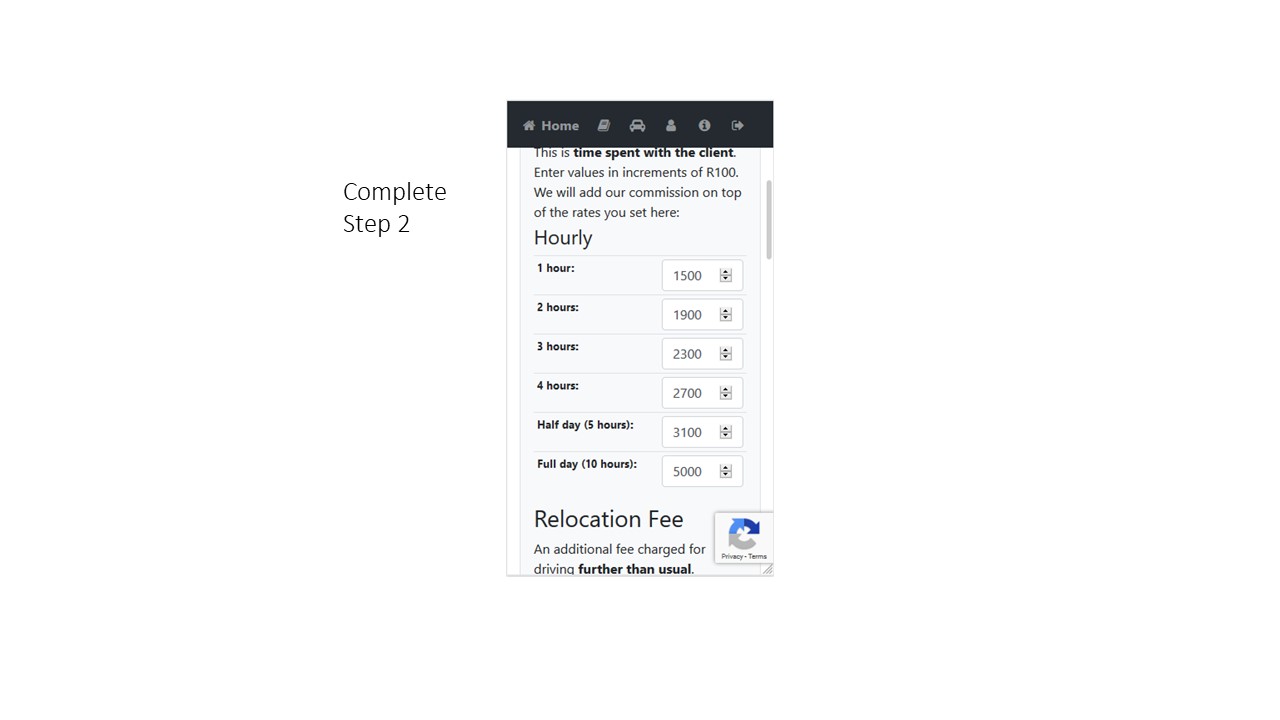
Next complete Step 2 - Pricing. Here you'll fill out your Base Pricing, which are fees based on the time you spend with the client. These fees should include a certain amount of driving (50 km recommended). If you want to charge different fees for Weddings, Matric Balls and Other events, change your Pricing Structure to "Package".
You can then add in your Relocation Fees. The Relocation Fee is an additional charge for driving a greater distance than your Base rate covers. For example, if you get a booking which is located in an area 50 km away, you will have to drive 100 km in total. Therefore you will want to charge an additional fee to cover the extra costs associated with travelling the added distance.
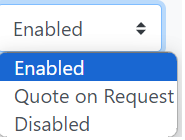
When completing the relocation fees there are 3 options:
- Enabled – this means you do service this area. At least one of these areas is required to have a relocation fee of zero (we recommend the area in which the car is based).
- Quote on Request (QoR) – the only option that can be QoR is “Other”. Clients like pricing transparency and are more likely to request your car if they know what prices are involved.
- Disabled – this means you do not service this area.
Just remember, whenever you get a request you will be given the option to change the price. You are only committed to a price once you accept the request. We however do not recommend constantly changing the price. When you increase the price above what was initially quoted you risk losing the client. Lastly you can change your car's pricing at any stage. Just remember that you'll still be committed to the pricing agreed to in any prior bookings.
When you increase the price above what was initially quoted you risk losing the client. Lastly you can change your car's pricing via your dashboard at any stage. Just remember that you'll still be committed to the pricing agreed to in any prior bookings.
Relocation fee: An additional fee charged for driving further than usual.
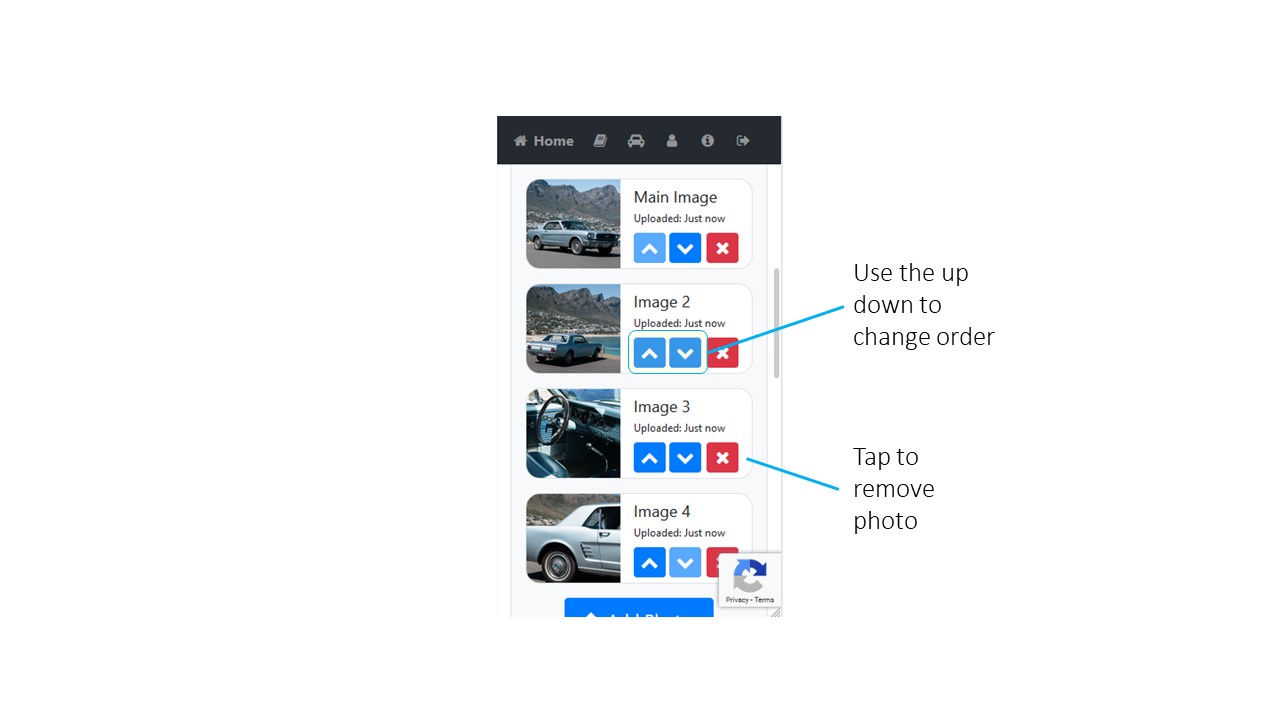
Now it's time to add photos. Find some high quality and well-lit photos which show your car clearly. The more angles the better and some close up shots of the interior always go down well.
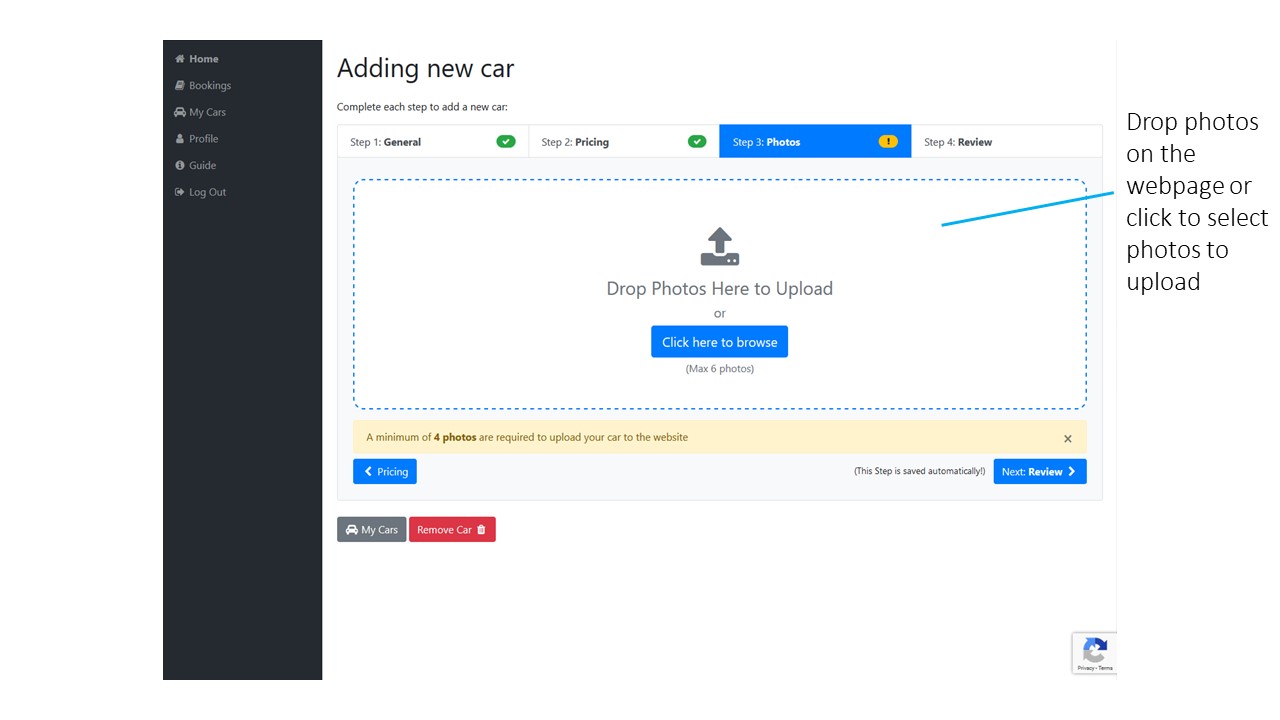
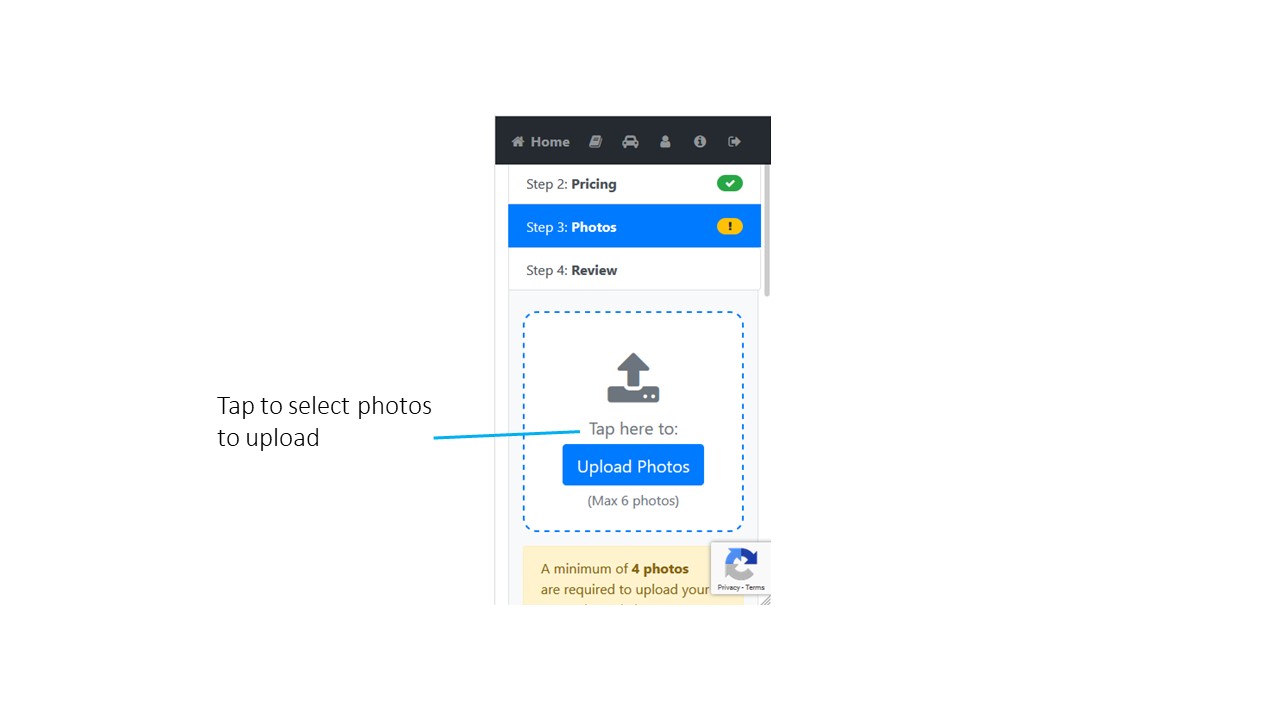
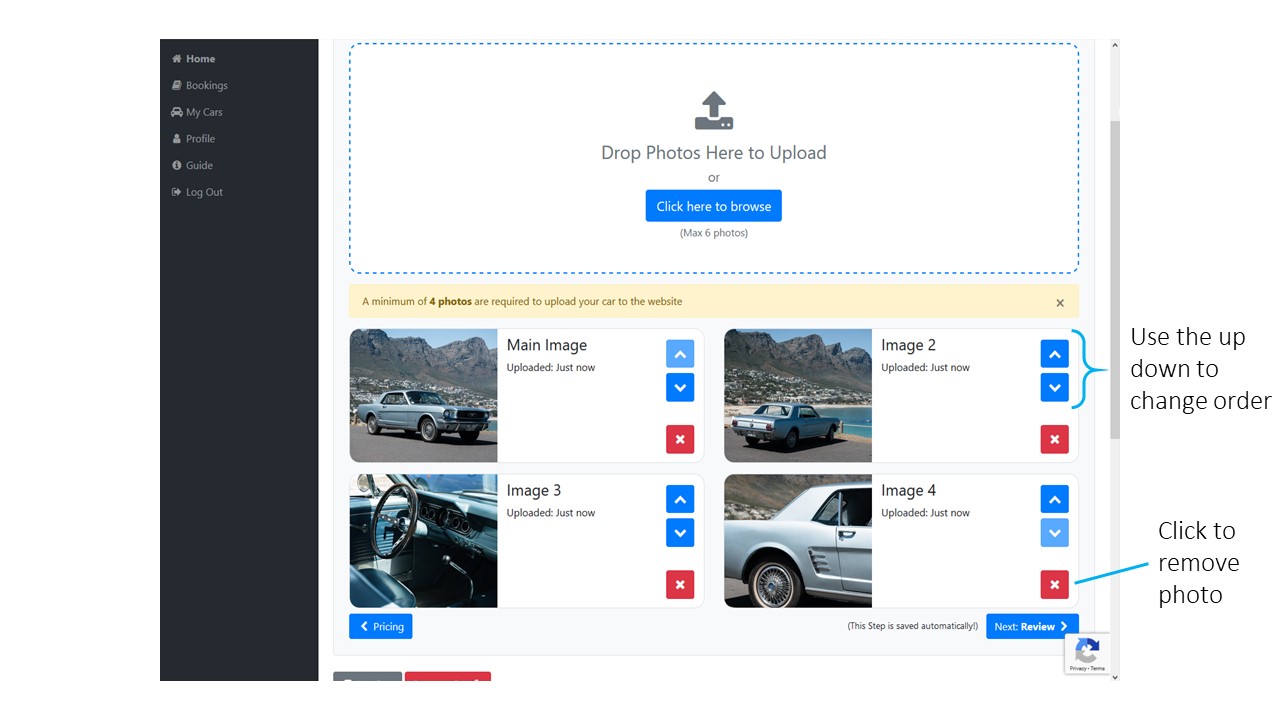
As you add photos, they'll pop up below the Upload Photos area. Here you can see a preview of them, remove them or change their order. Remember a minimum of 4 photos is required to upload your car to the website and a maximum of 6 is allowed.
This Step is automatically saved, so you can proceed to the final Step as soon as you've uploaded sufficient photos.
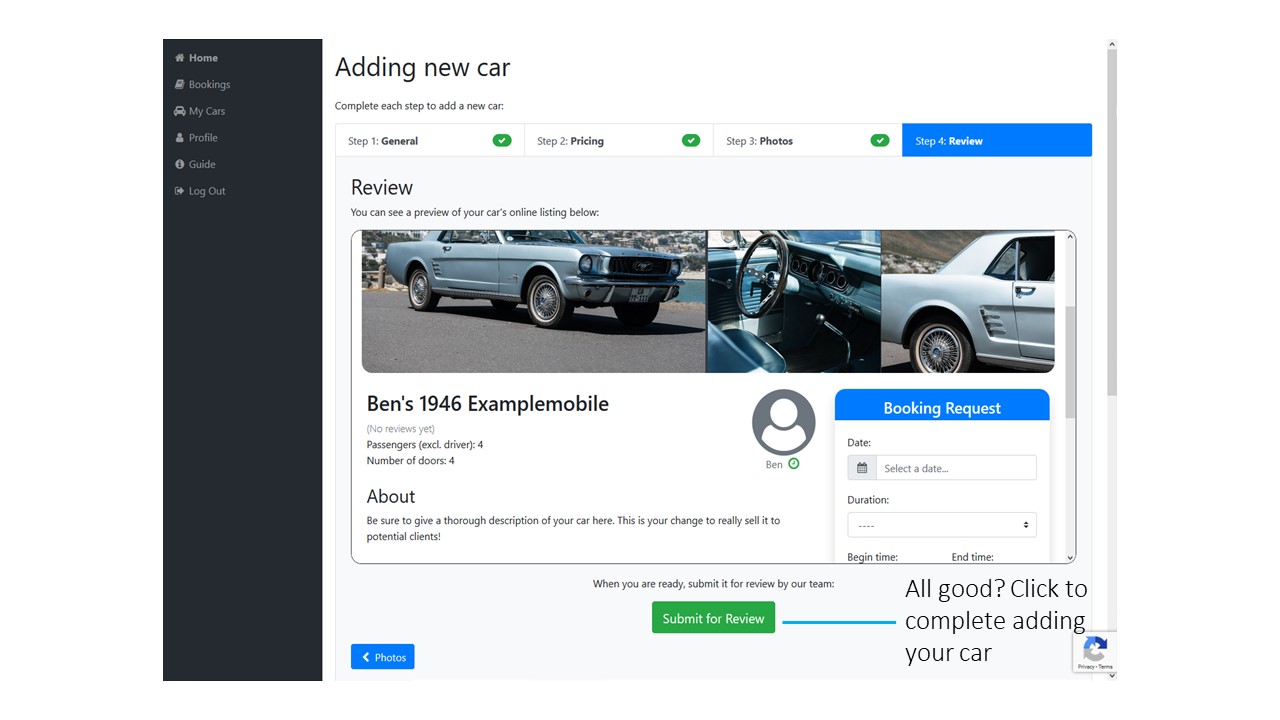
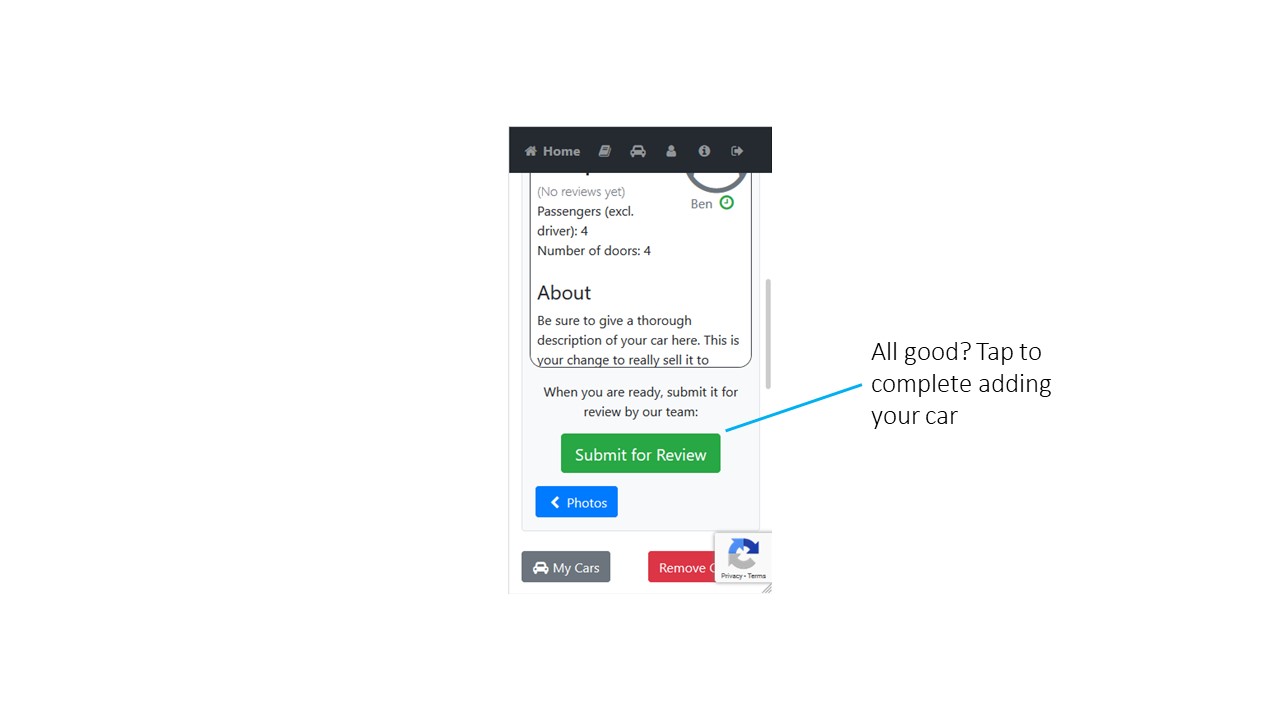
The final Step shows you a preview of what your car's webpage will look like once online. This gives you a chance to review all the details. You can check your pricing by playing around with the Booking Request form. Select Duration to see your Base Fees and select a Suburb to see your Relocation Fees.
You'll notice that the pricing is slightly different to what you inputted. This is because our commission is added on top of your pricing.
Once you've reviewed all the details, you can submit your car for review by our team. Once we've approved it, you'll get an email and your car will be available for bookings online!
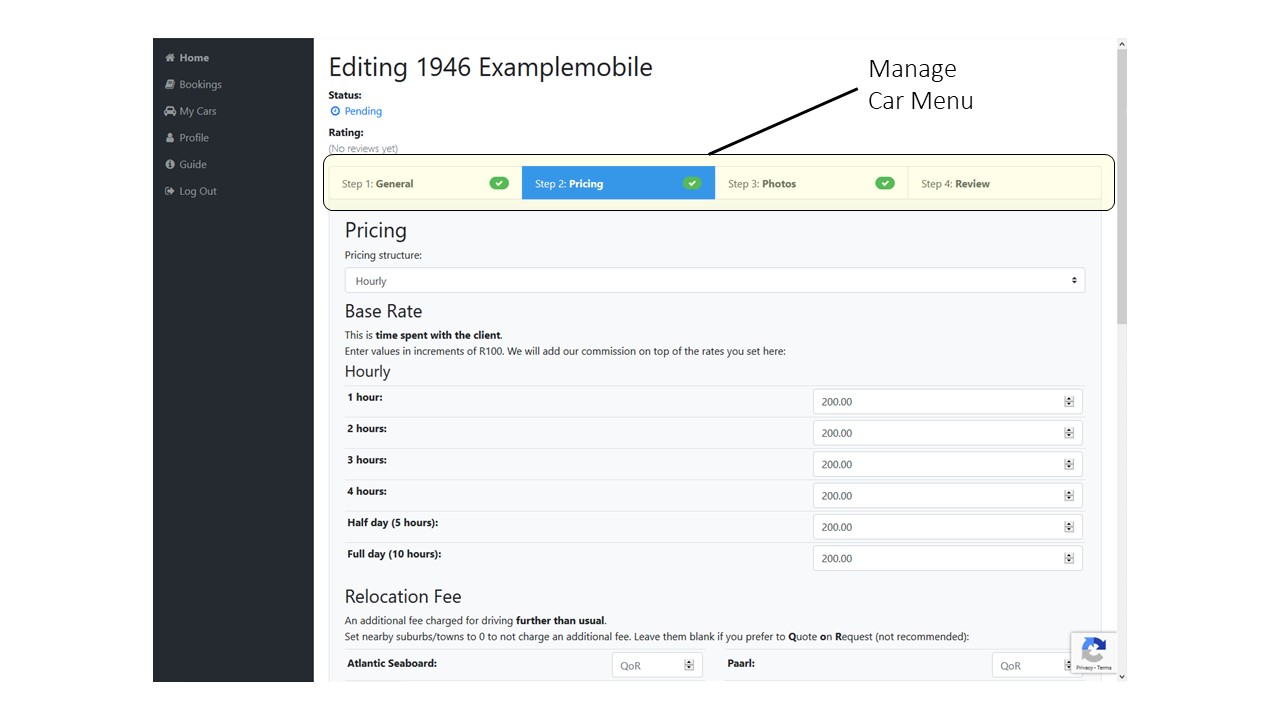
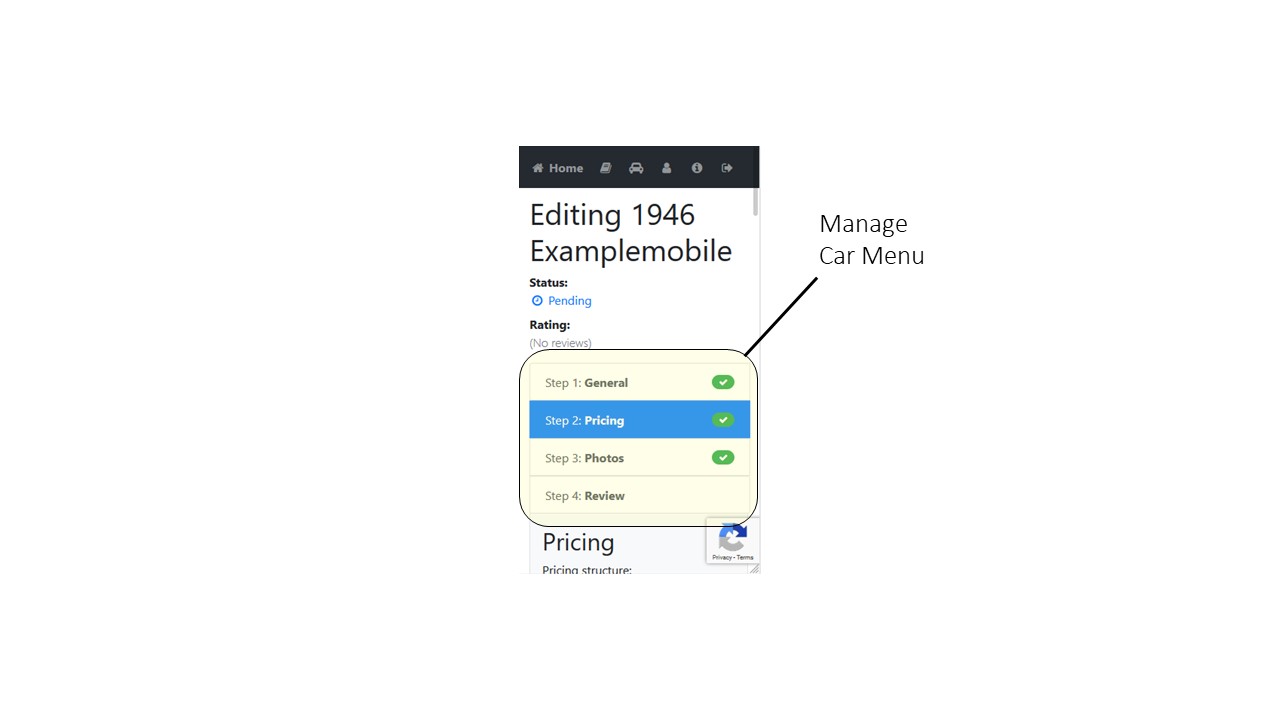
As a final note, if you're ever making changes to an existing car, you can quickly navigate between Steps by using the Manage Car Menu:
Still stuck? Give us a ping, we're always happy to help:
The Booking Process
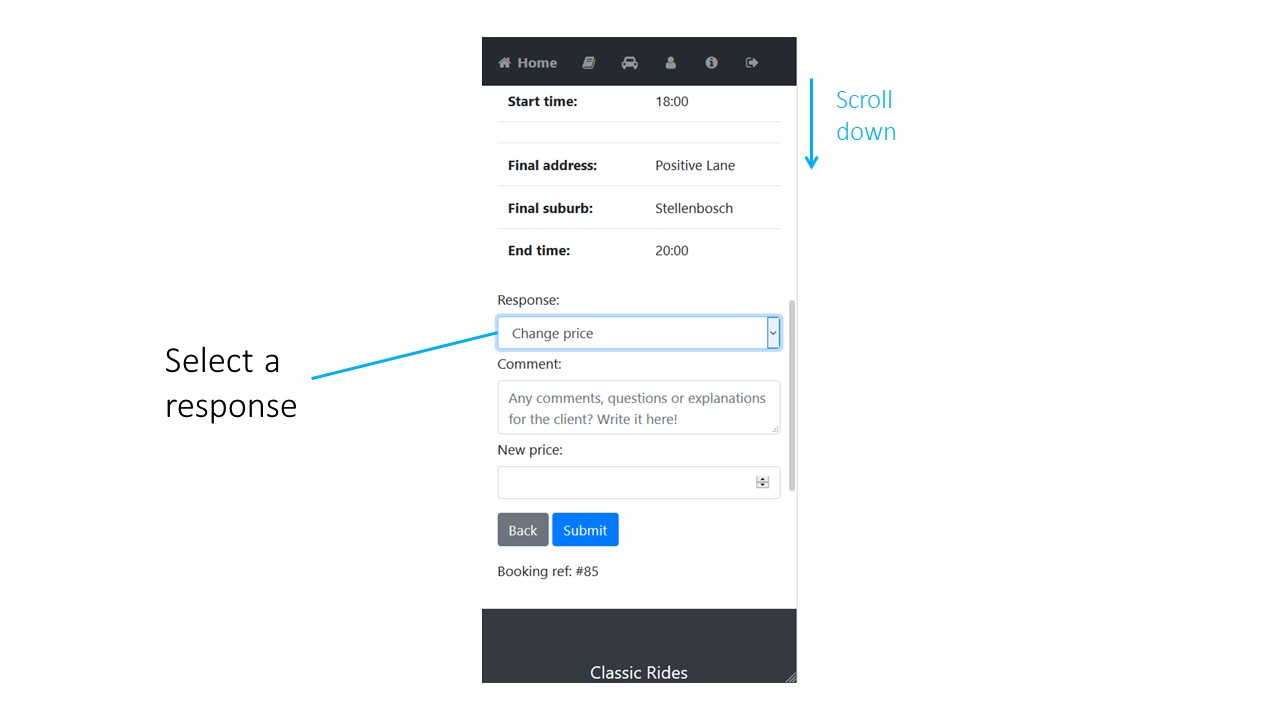
On the booking webpage you will have several response options:
- Accept
- Reject
- Ask for additional information
- Change price
Note: your prices should be set upfront on your dashboard. The only time you should change the price when you receive a booking request is if a client specifies the wrong suburb/location or selects “Other – Quote on Request.
Please do not supply your contact information to a client when responding to a booking request. You will receive their contact number (and the client will receive your contact number) once a deposit has been paid.
You can manage all bookings and see which are awaiting your response in your Owner dashboard in either a calendar or sorted list format.
Once you've confirmed availability we'll notify the client. In order to confirm a booking, we require a minimum 50% deposit from the client (with the balance to be paid at latest 48 hours before the booking). As soon as the deposit comes through we'll notify you that the booking is confirmed. If your availability has changed in the interim, please let us know.
To the best of our ability, Classic Rides attempts to follow up on every booking request 2- 3 times. Until a booking is paid the vehicle remains available for other Customers to book allowing Owners to accept multiple requests on the same day. Once a booking is confirmed, all other pending bookings on the same day will be cancelled and the client/s informed.
Bookings are auto cancelled and removed from the Owner’s dashboard if not paid in 14 days. These bookings will show as “rejected”.
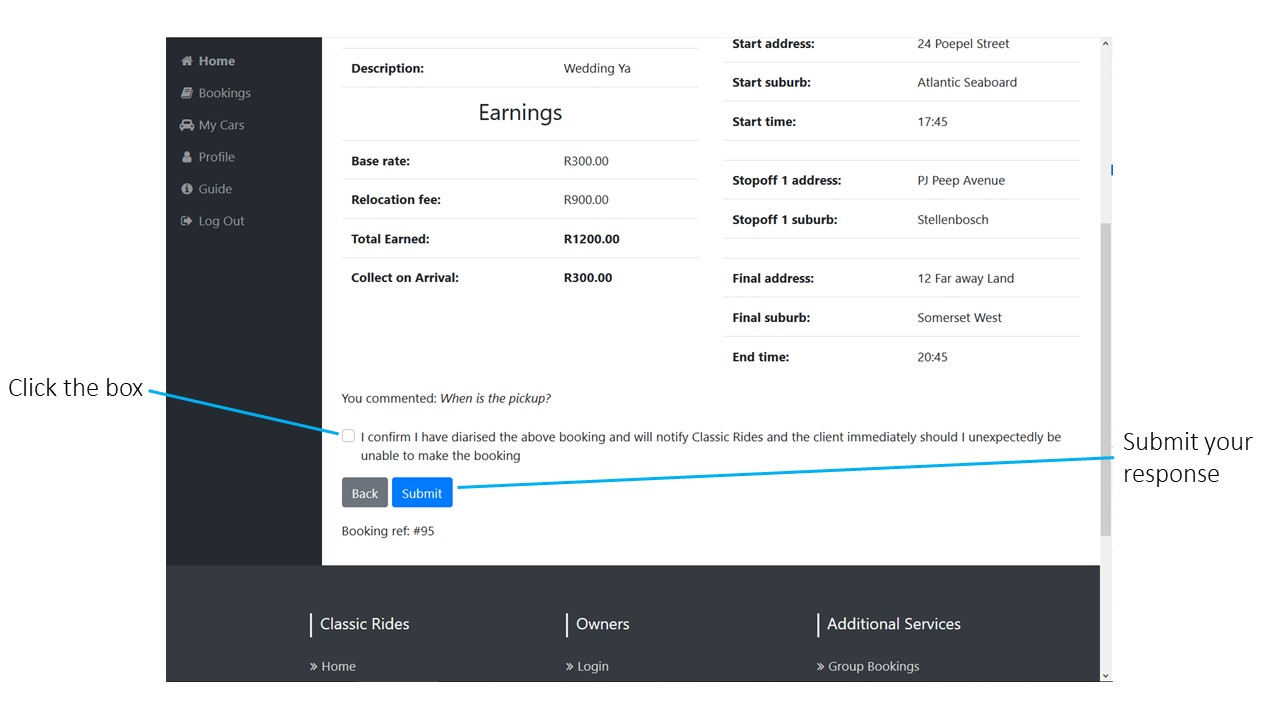
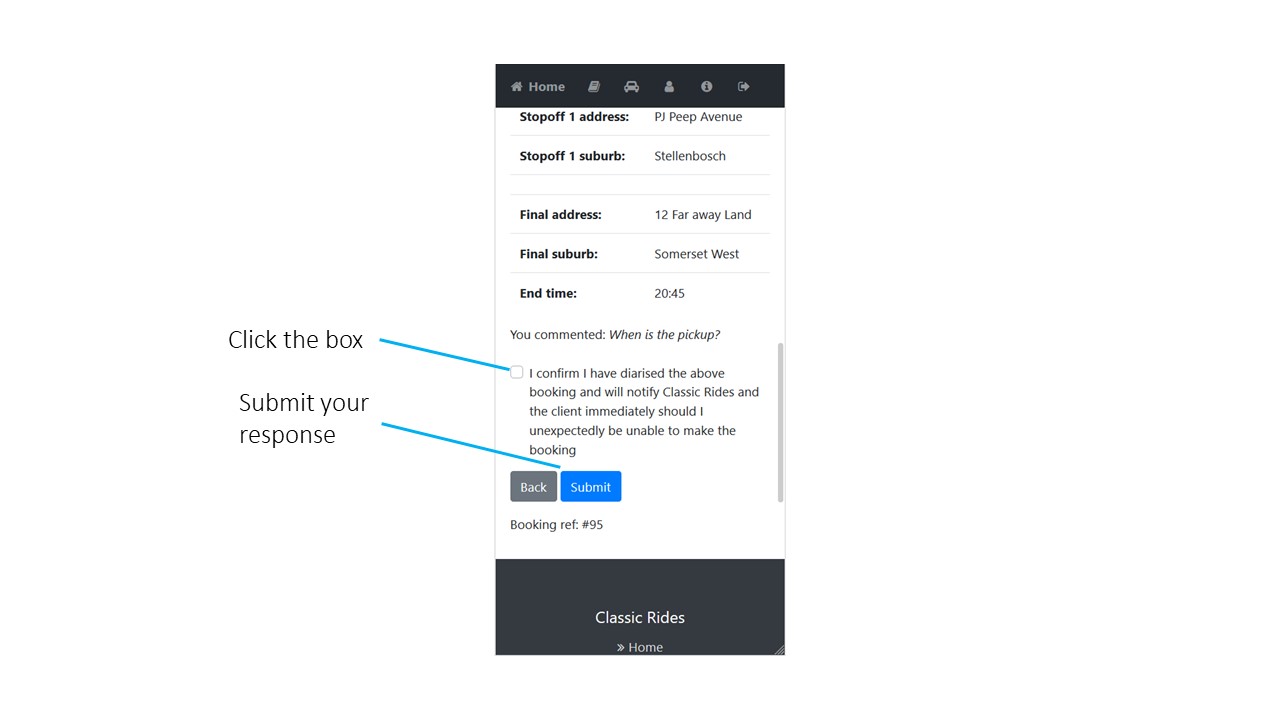
Once we have confirmed the deposit, we require that you give us final confirmation that the event has been diarized on your side. At this point we will give you the final booking information, including the client's contact details. If the client makes any changes after this stage, you will be notified via email and allowed to respond.
You can manage all bookings and see which are awaiting your response in your Owner dashboard in either a calendar or sorted list format.
Clients are hiring a car and a chauffeur. Please wear suitable business attire when carrying out the booking. No t-shirts, informal shirts, short pants or casual open shoes are allowed.
Check the address ahead of time and plan to arrive 15 minutes early.
If the booking goes over the time specified by more than 20 minutes, you can choose how to continue:
- You/Your driver can inform the client that the booking is going into overtime but can choose not to charge an additional fee.
- You/Your driver can inform the client that there is an additional overtime fee and what that overtime fee will be. This additional charge should be paid over directly to you/driver at the event. Classic Rides is not responsible for collecting payment for overtime during or after an event.
- You/Your driver can inform the client that the specified time booked is overtime and that they are unable to remain at the booking. In cases like this, let the client know in advance that the car cannot stay any longer than the allotted time.
Reviews help you get further bookings. At any time, after the completion of a booking, the client can leave a review via their Classic Rides booking link (included in all emails sent by the Classic Rides system). In addition, 18 hours after the completion of a booking, Classic Rides will email the client and invite them to leave a review.
The more positive reviews you get, the earlier your car will be shown on our site. This will typically help substantially with getting more bookings, so it pays to do your best to wow clients!
Your Dashboard
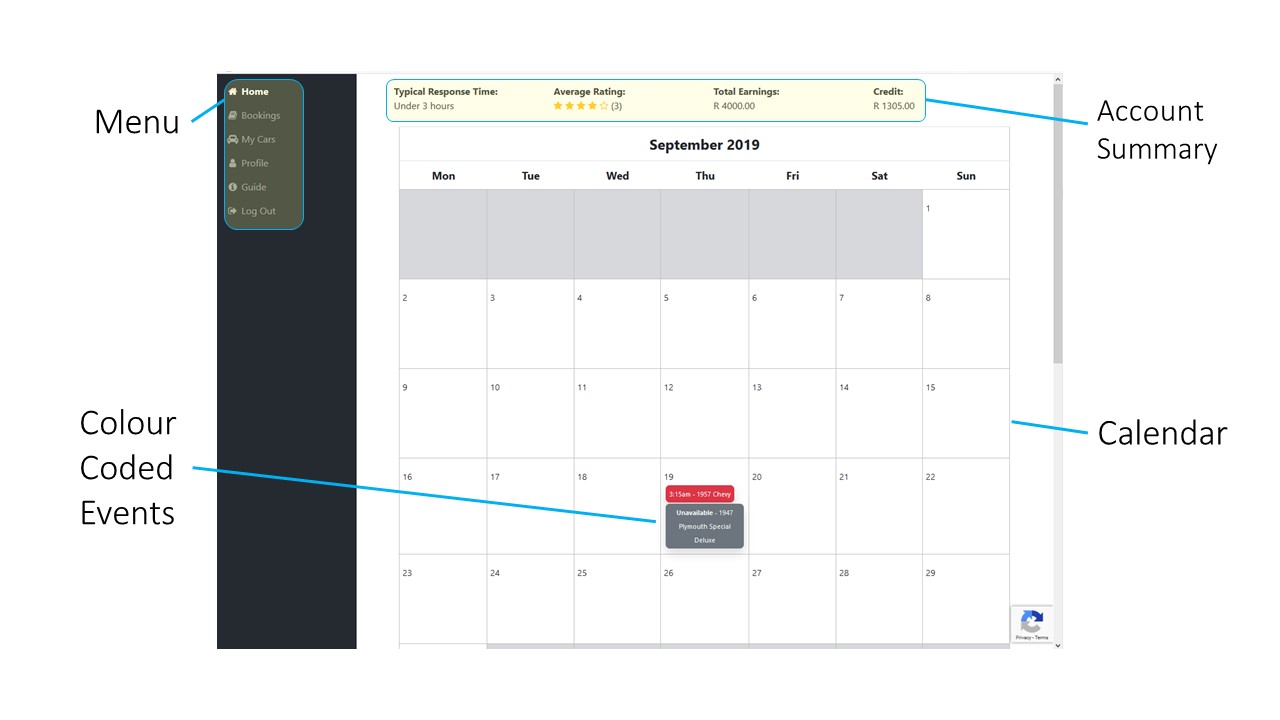
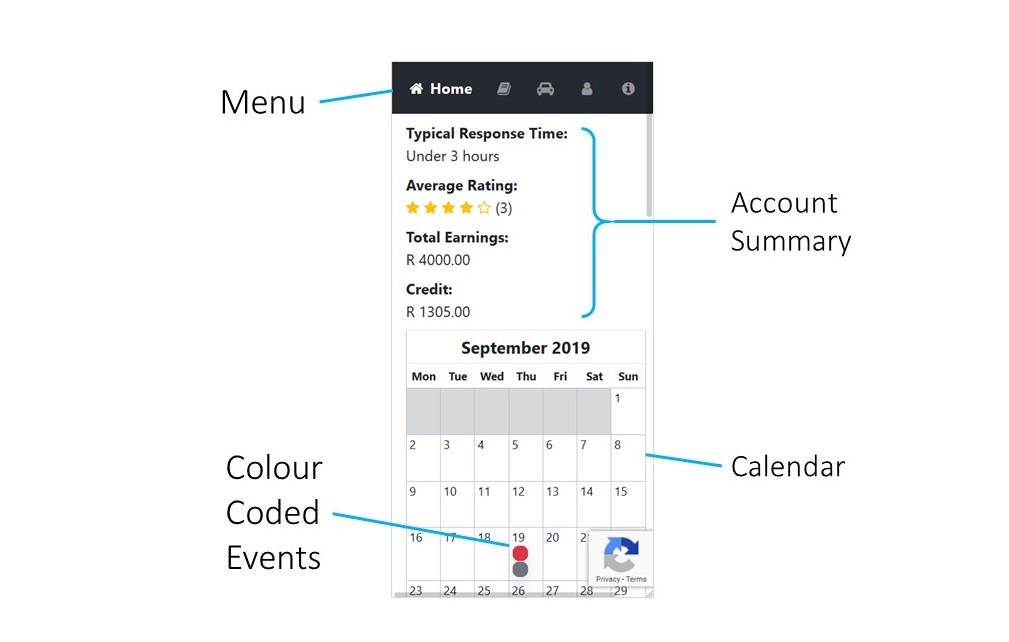
Menu
The Menu is the portal to your Classic Rides account. From here you can navigate to webpages that allow you to add and edit your cars, change your profile (ie. contact number and banking details) and even access this page, "Guide", if you ever get lost!
Account Summary
The account summary section highlights a few important details for you. You can see how you are performing in terms of response time and client feedback (reviews) as well as see your total earnings through Classic Rides and if we owe you any money.
Calendar
The Calendar helps you keep organised by showing you your bookings and requests by date. Calender items are colour coded to help you identify their status at a glance. The color coding is explained in the Legend found under the Calendar. Simply click an item on the calendar to access it and view the details.
Now, scrolling down to the bottom of the Calendar...
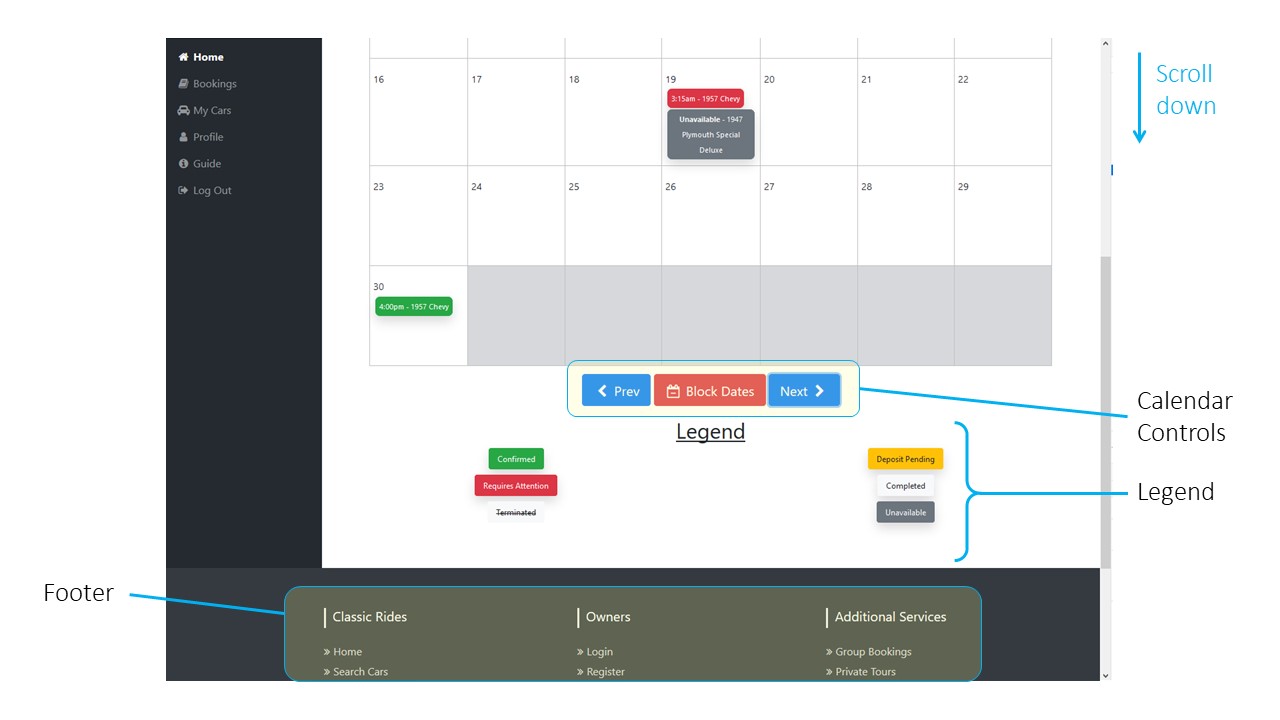
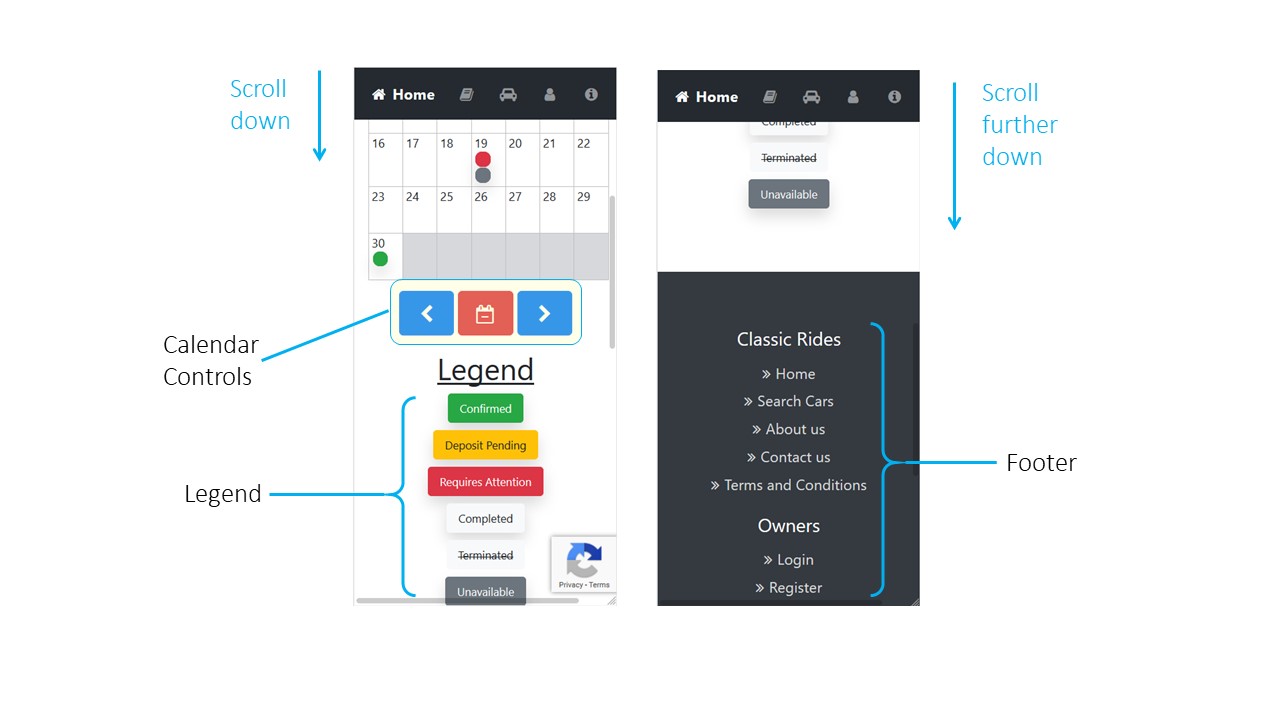
Calendar Controls
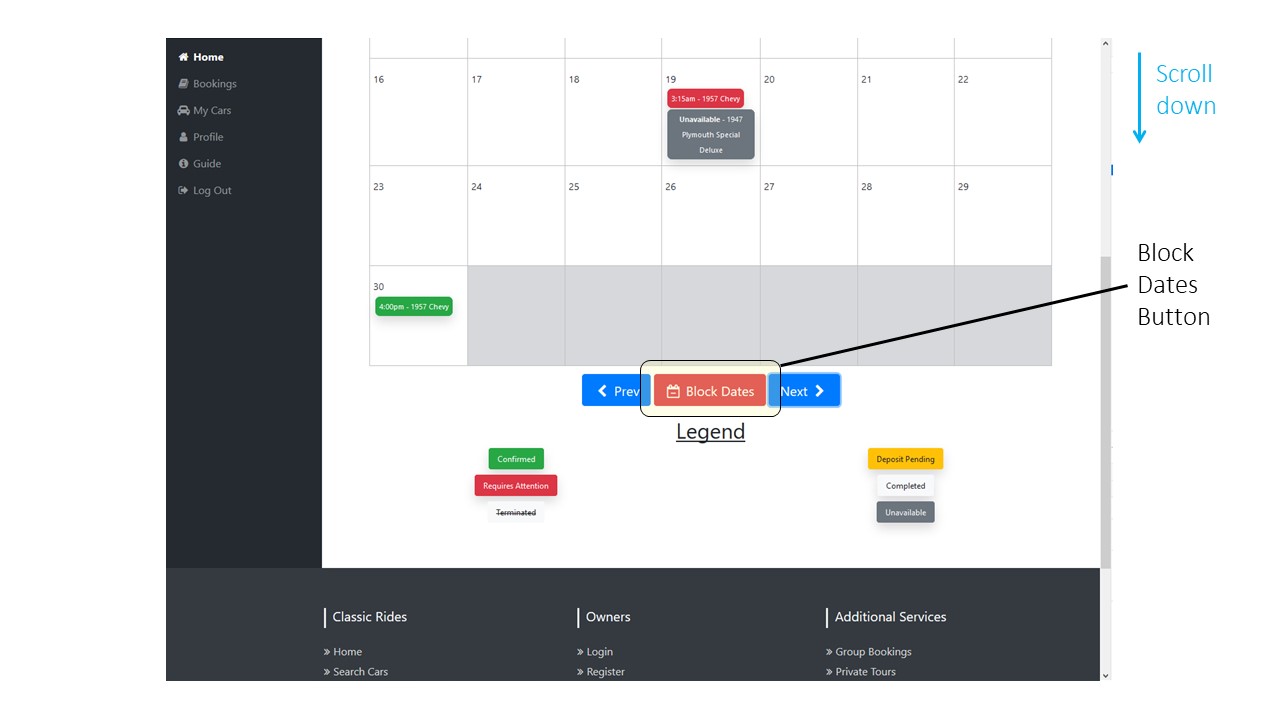
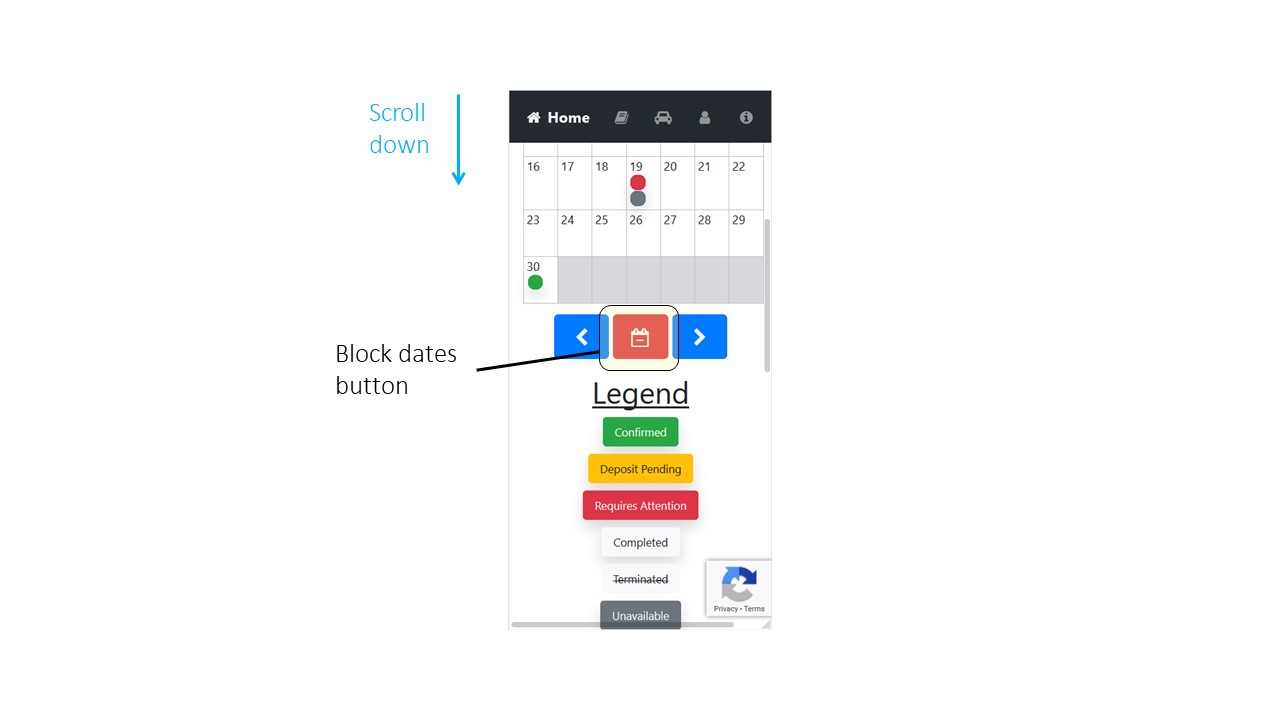
The Calendar Controls area consists of three buttons. The two blue buttons, "Prev" and "Next", allow you to navigate between months of the calendar. The red "Block Dates" button allows you to block off dates for individual or multiple cars. See Blocking Dates for more info.
Legend
The Legend details the colour coding for Calendar items. Take time to familiarize yourself with these. If you ever forget, simply scroll to the bottom of the Calendar to find them.
Footer
The Footer is your always present portal to the entire Classic Rides website. Should you want to visit the home page, search through all the cars available to compare your pricing or login to your dashboard, you can find the relevant links here.
Blocking Dates
The Block Dates button, found below the calendar allows you to block off a single or range of dates for your cars. Clients will no longer be able to book a car on blocked off dates. This makes it easier to filter your booking requests when going away on holiday or if your car has been booked through a different platform. If your car has a confirmed booking on a date it will automatically be blocked off.
If you have accepted a booking but the booking has not been confirmed (i.e. paid) and the vehicle is no longer available, you can block off the date and the booking will be automatically cancelled and the client will be informed.
Please keep your dashboard up to date. If your car shows as available, clients expect that it is available and we hate disappointing them.
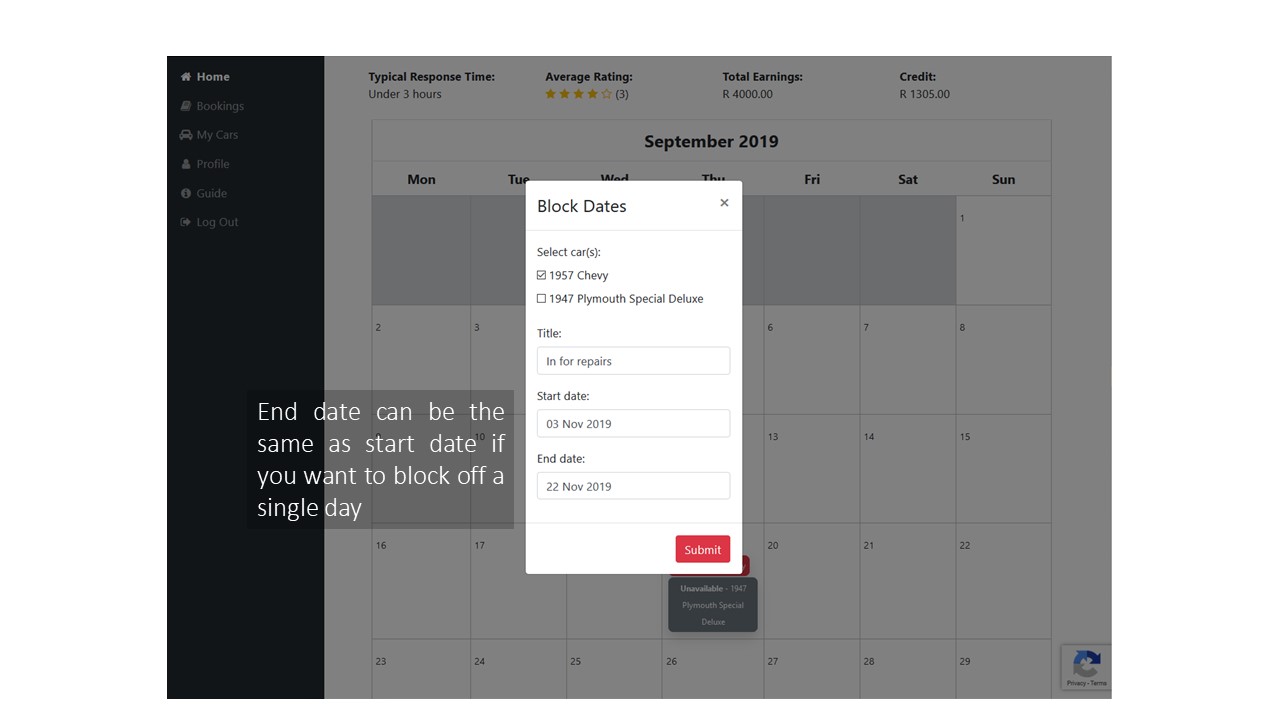
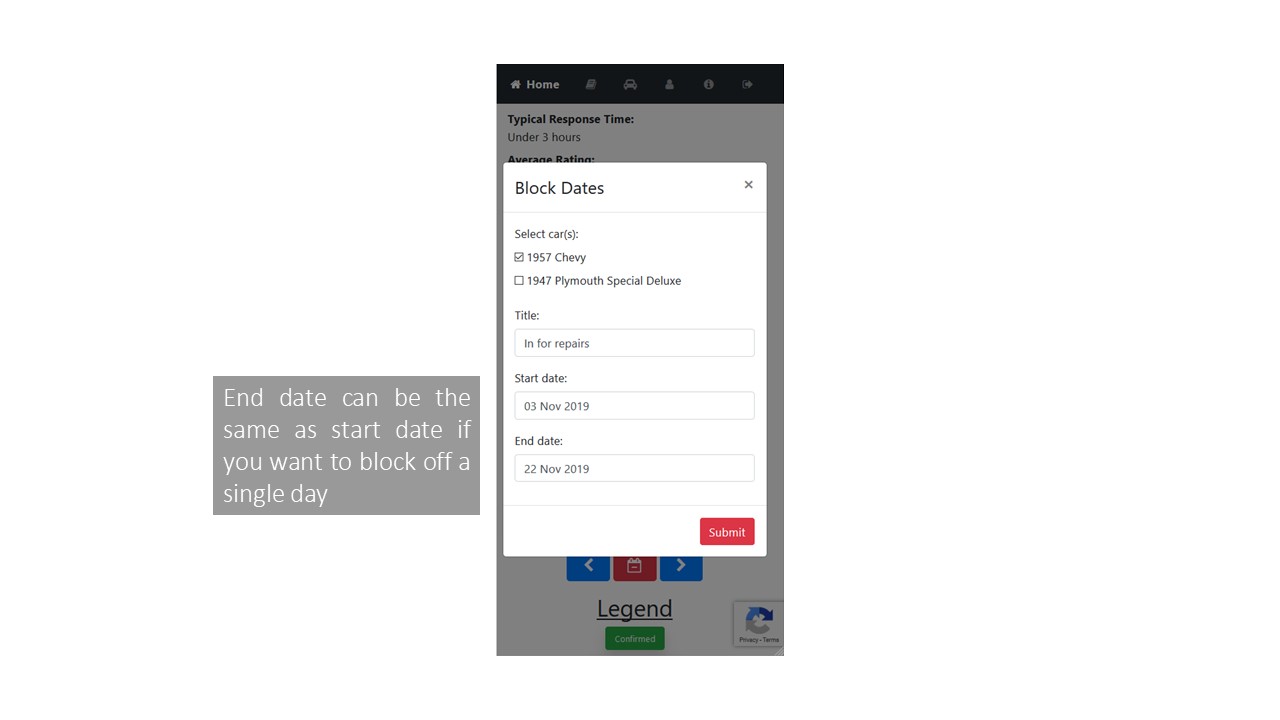
Clicking the red "Block Dates" button opens a dialog which allows you to select which of your cars you would like to block the date for, write a short label for the unavailability and select the date range. Note that if you want to block off a single date, make the End date the same as the Start date.
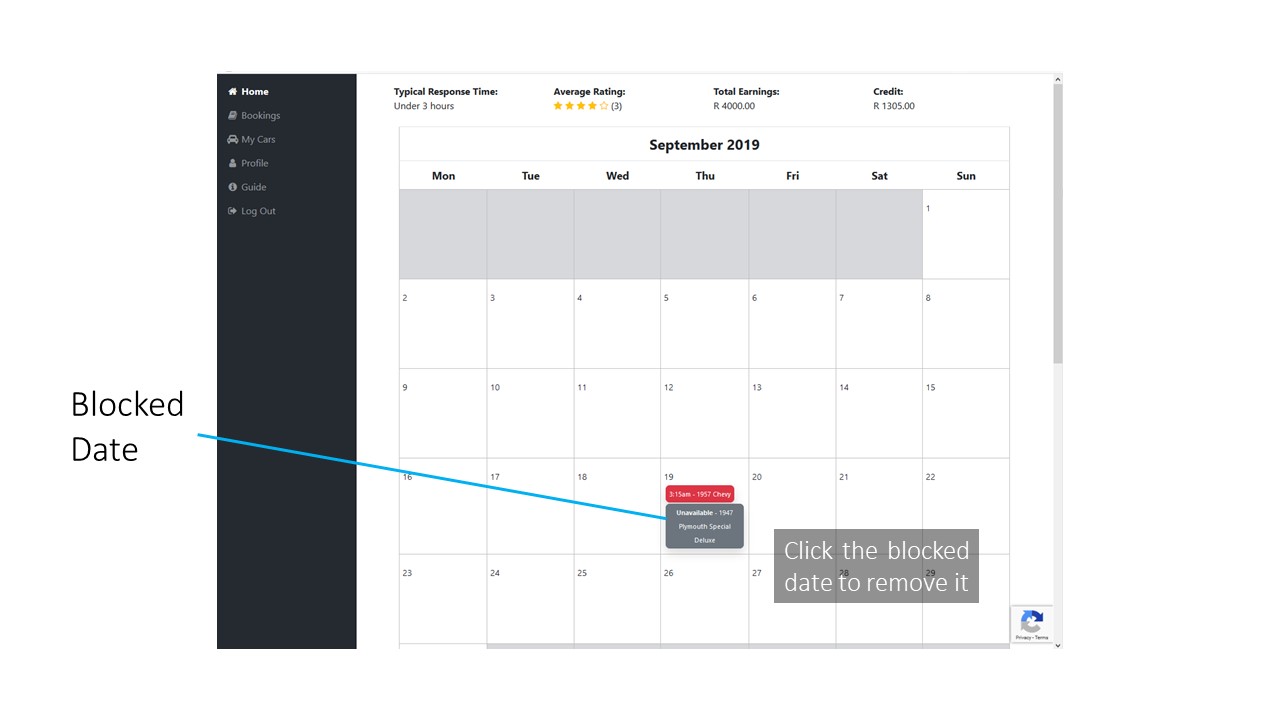
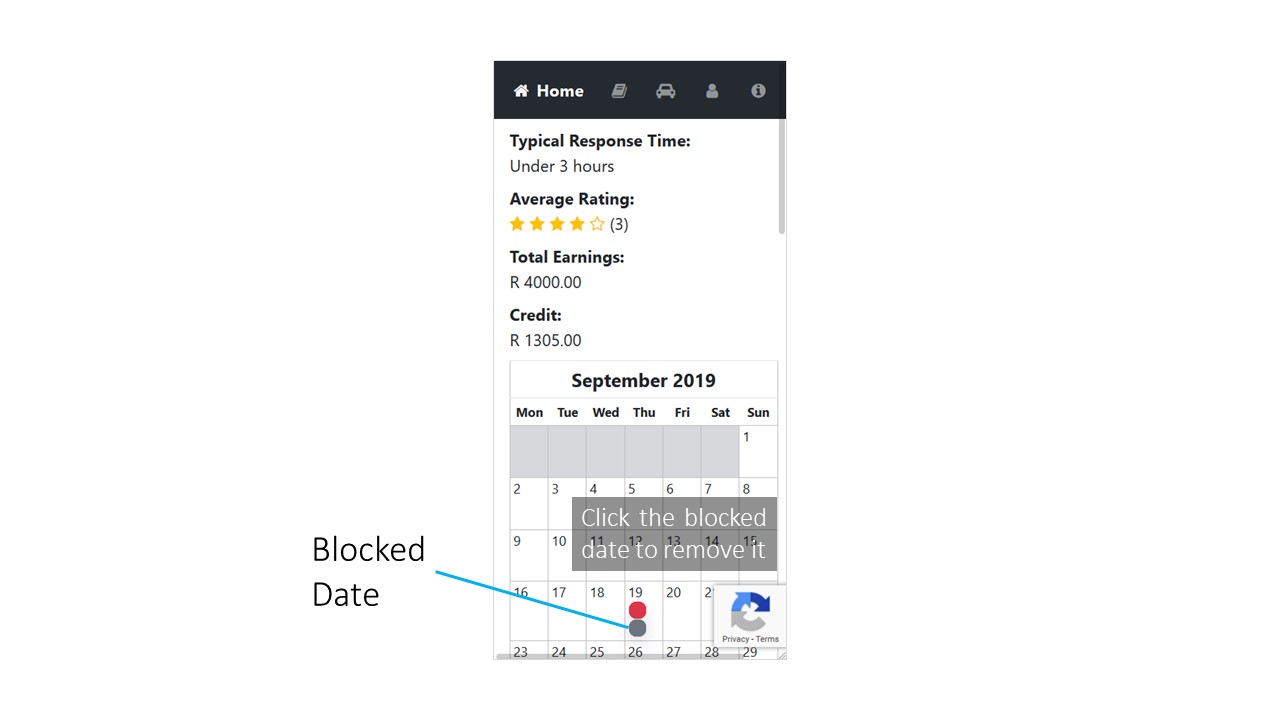
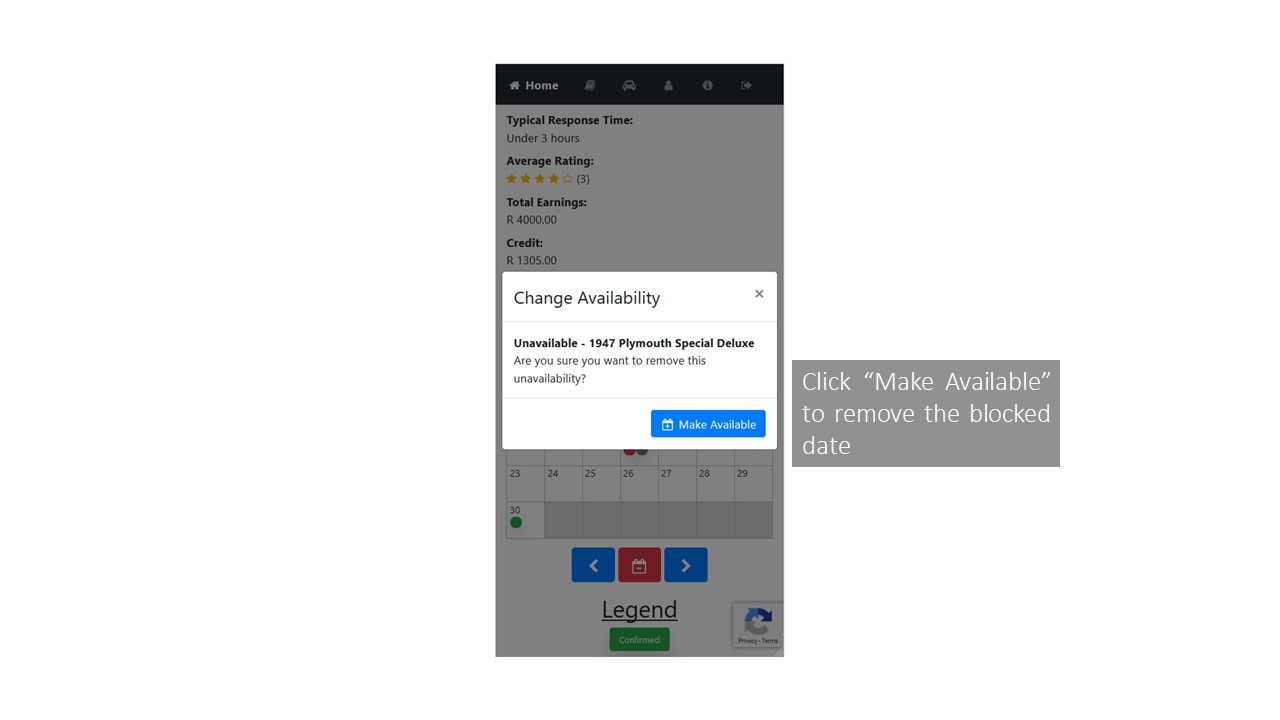
If you want to remove a Blocked Date, simply click it on the Calendar. You can identify Blocked Dates by their colour. If you're unsure what colour Blocked Dates are, check the Legend below the calendar.
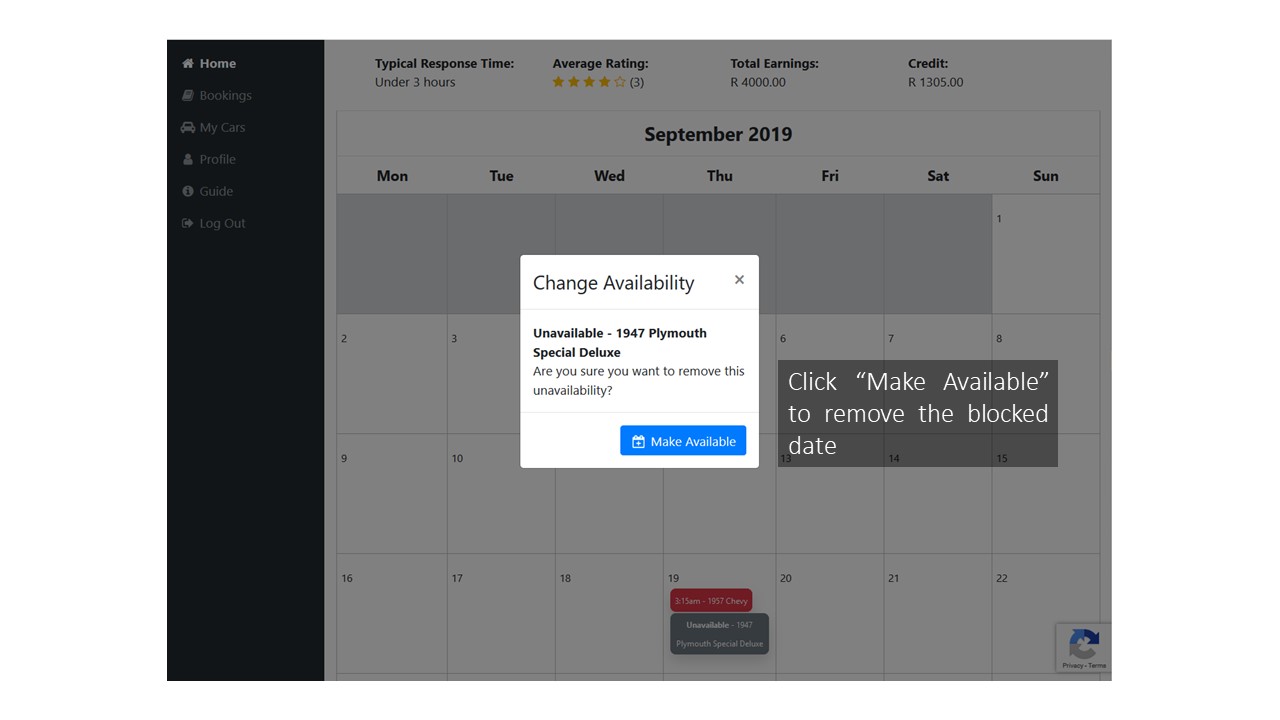
Clicking the Blocked Date brings up a dialogue as shown below. Click "Make Available" to remove the Blocked Date. If you clicked the Blocked Date by mistake and don't want to remove it, simply click the 'x' in the top right of the dialogue, or anywhere outside the dialogue.
The Booking View
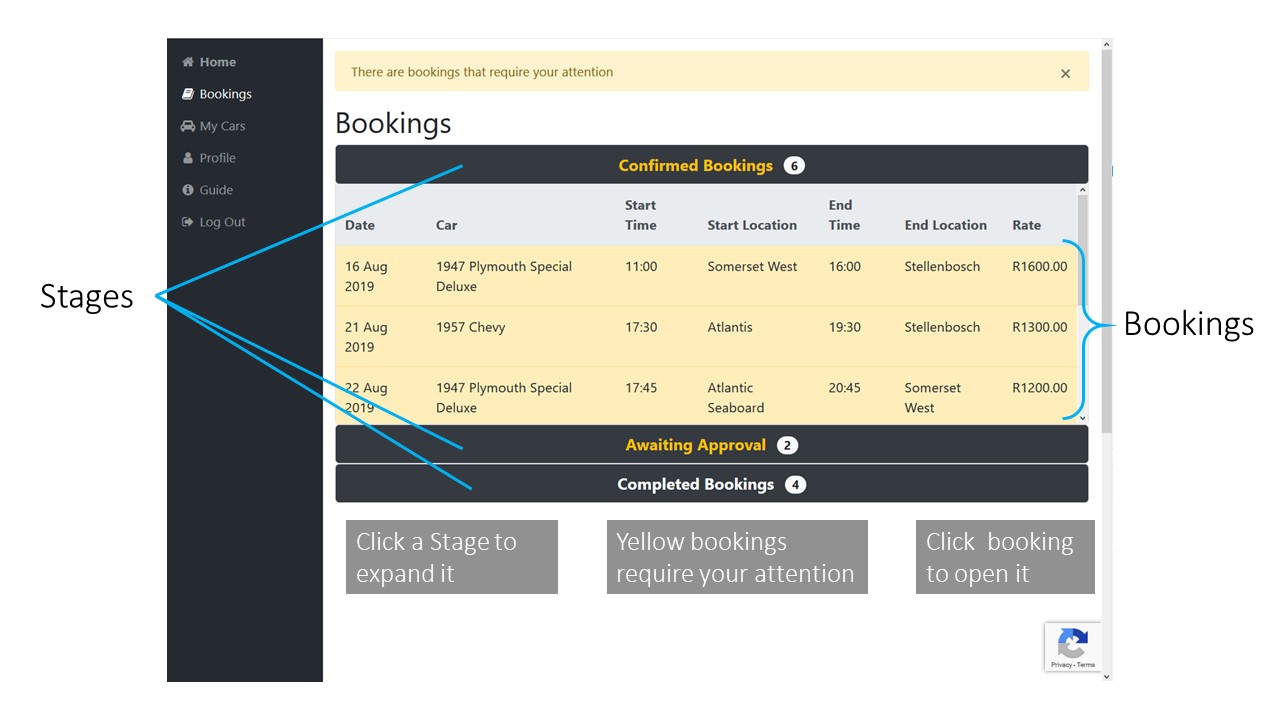
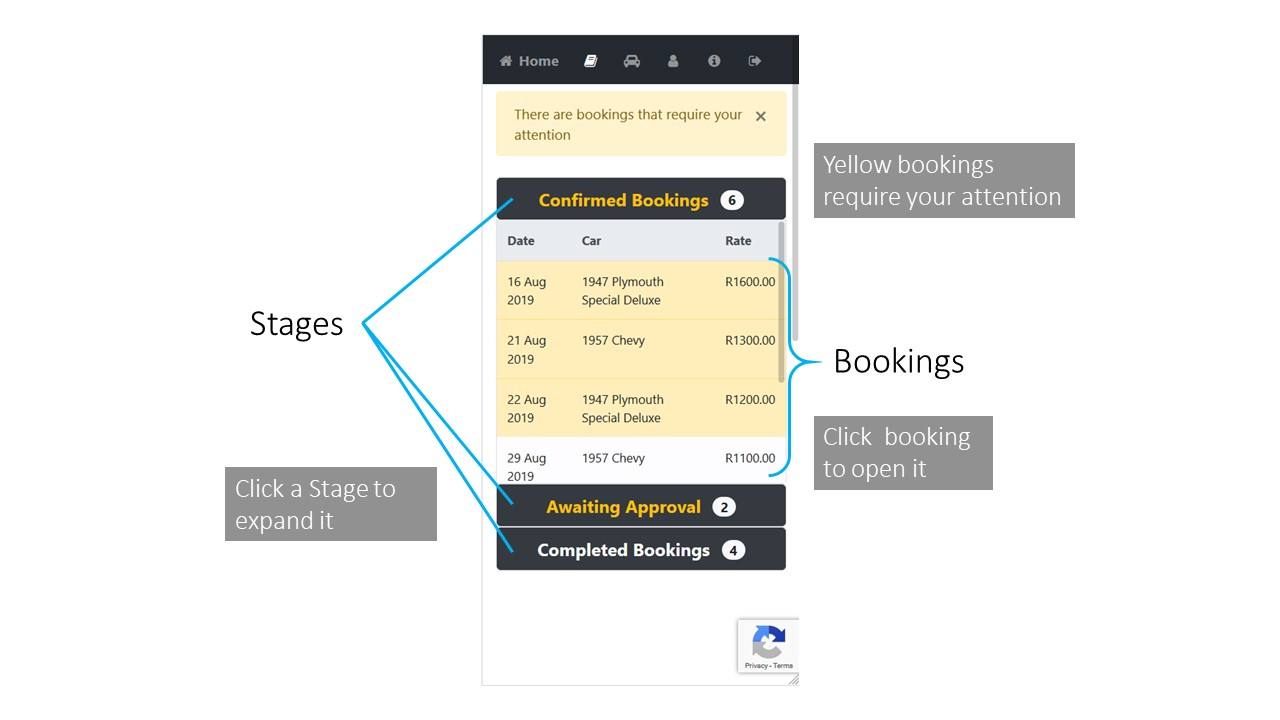
The Bookings page groups your bookings into stages (ie. Awaiting Approval, Confirmed and Completed) and orders them by date. This provides an additional view that makes it easier to find all your bookings. Items coloured yellow indicate that they require your attention. A stage heading will be coloured yellow if a booking within it requires your attention. To access these bookings, simply click on them. You can expand and minimize a stage by simply clicking its heading.
Responding to Bookings
You can access any booking simply by clicking on it either in the Calendar or in the Bookings views.
The Booking page contains all the information you need to know with regards to a booking. Note that only once a booking is confirmed will the client's contact details become visible.
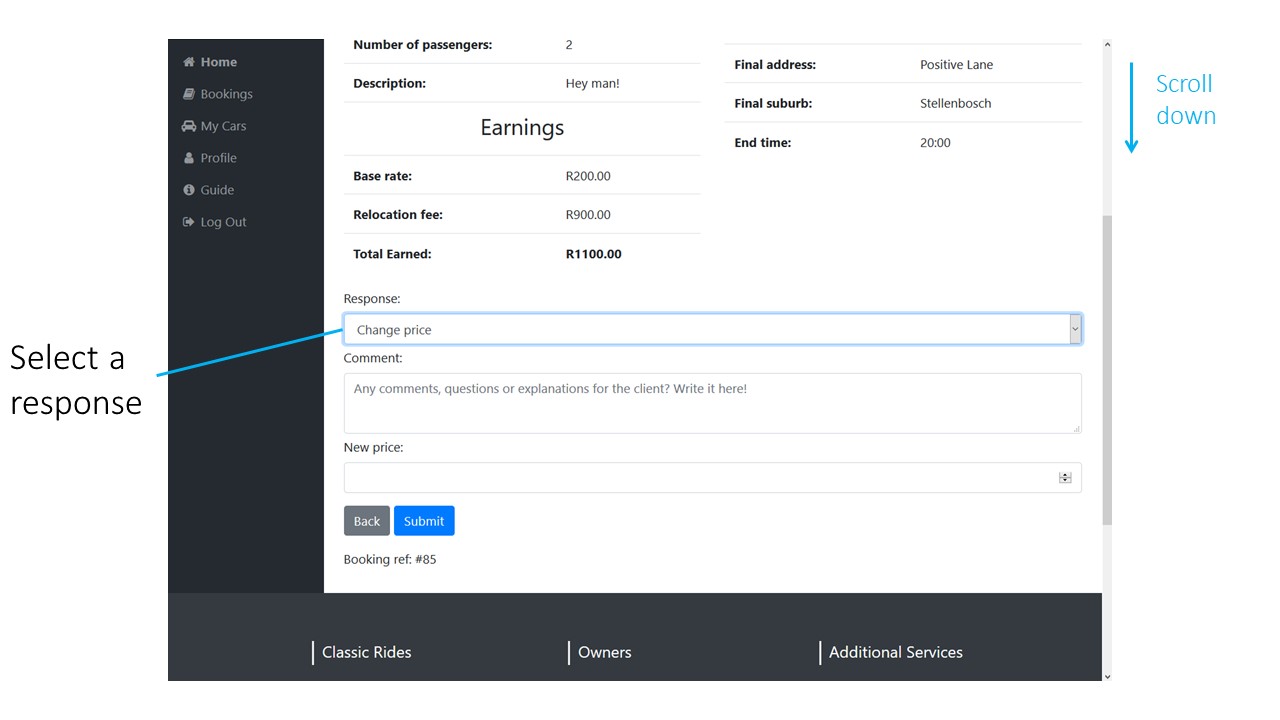
You can respond to a booking by scrolling to the bottom of the page. If the booking is new, or the client made changes, you will be asked to select a response.
Once a booking is confirmed, we will also ask you to confirm you have diarized it. If the date changes afterwards, we will ask you to acknowledge this change.
Printing a Booking
To print a booking, first navigate to the relevant booking as explained in Responding to Bookings. You can print bookings using your internet browser's built in print function. Some guides for popular internet browsers:- Mozilla Firefox - https://support.mozilla.org/en-US/kb/how-print-web-pages-firefox
- Google Chrome - https://www.wikihow.com/Print-Web-Pages-with-Chrome
- Microsoft Edge - https://www.laptopmag.com/articles/print-microsoft-edge
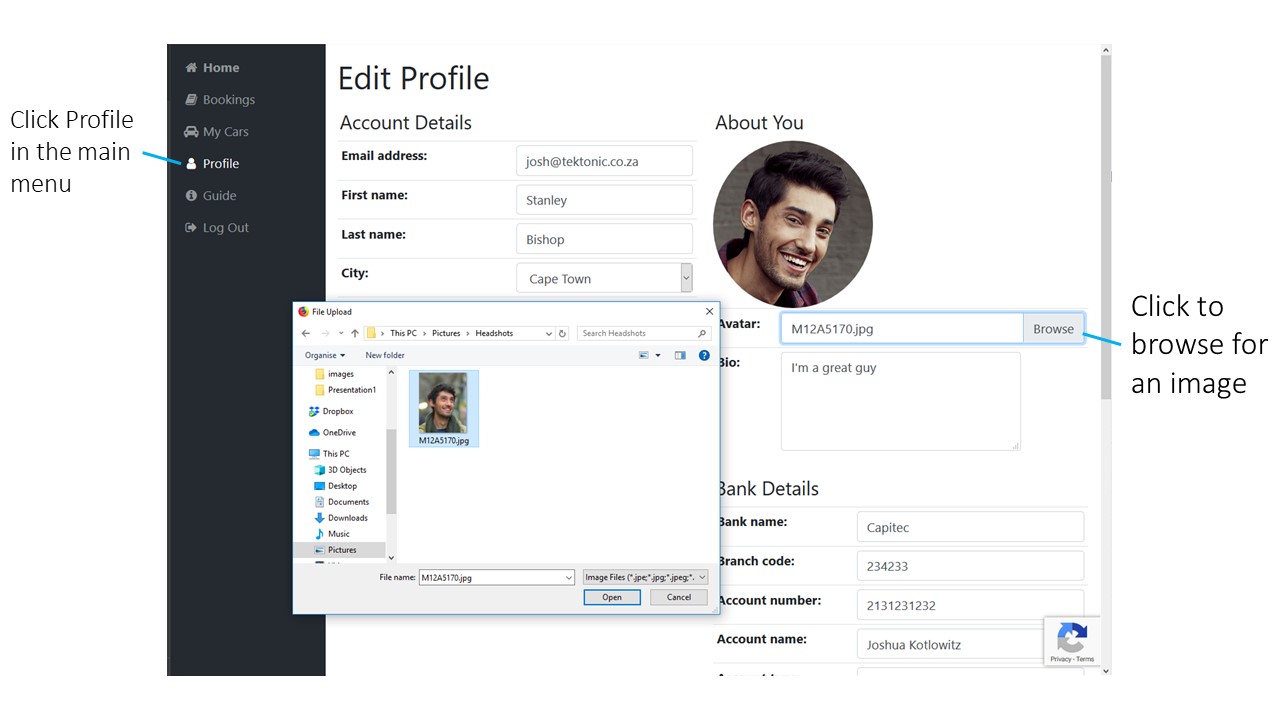
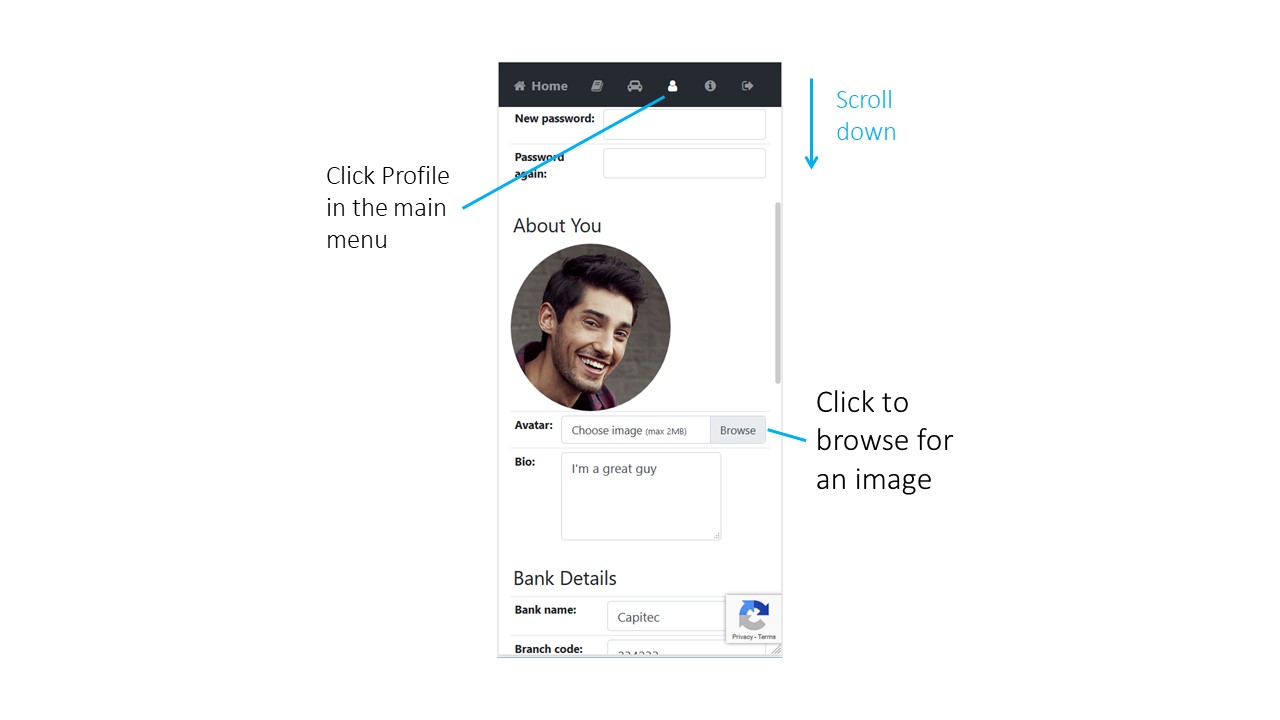
Adding a Profile Picture
We've found that adding a profile picture of yourself increases the chances of a client booking your cars. Your profile picture is shown alongside all of your cars. Adding a profile picture can be done from your Profile view which is accessed through the main menu (see Your Dashboard).
Find a close up, friendly looking photo of yourself that is less than 2MB in size. If you need to compress the image, use a free online tool such as Compress JPG.